Hi folks, first post.
I bought a Sony A7 last summer and quickly realised what a great camera it would be for macro, so dug out my old OM gear and started playing... then I discovered stacking, this forum and have been really enjoying experimenting.
I'm mainly shooting flowers and insects from 1x-4x. I've been trying to work out answers to a couple of problems - firstly how to reduce the halos you get from foreground items against background, secondly rendering the transfer from sharp to blurred a bit more naturally, i.e. like a traditional single shot where blur steadily increases either side of the focus plane, rather than a chunk all sharp then suddenly all really blurred.
I've had a few ideas but am struggling to think them through or find answers on the forum - I can't come up with a precise enough search term that doesn't return a thousand results. I'm sure it's been done so feel free to throw me some links if it's easier than typing...
Here are my ideas:
1) reduce halos by shooting at higher mag (stack and stitch) - guessing higher mag would render the foreground more out of focus so you get a sharper image of the back? And therefore a smaller halo once the whole image is back to original size. A lot more work though.
2) improve focus transitions by shooting some small aperture shots at either end of the stack (e.g. f/16-22 nominal when most of the stack is at f/4). It doesn't matter about losing resolution due to diffraction, as what I'm after are some less blurred areas, not detail. No idea if or how ZS would handle incorporating this though.
3) reduce halos (thinking of the 'mist' effect around hairs here) in pre-processing. Logic being stacking throws away ~95% of the file, so as long as I don't affect the sharp detail too much I could shoot RAW and do some heavy handed contrast/ clarity type work on the out of focus parts.
Many thanks for all the help I've already gleaned from the forum.
Halo reduction
Moderators: rjlittlefield, ChrisR, Chris S., Pau
-
Charles Krebs

- Posts: 5865
- Joined: Tue Aug 01, 2006 8:02 pm
- Location: Issaquah, WA USA
- Contact:
Adam,
It would really be a good idea to post some examples of the "haloes" you are referring to.
As far as abrupt transitions from "sharp" to "out-of-focus" the idea of shooting a starting and ending image at a much smaller aperture can be quite effective. Unfortunately some of the optics used for high magnification stacking will not have adjustable apertures. You often need to compose with that in mind, or shoot much larger stacks than you really want and perhaps do some blurring in post.
-
rjlittlefield

- Site Admin
- Posts: 23626
- Joined: Tue Aug 01, 2006 8:34 am
- Location: Richland, Washington State, USA
- Contact:
Adam, welcome aboard! 
I'm the fellow who wrote Zerene Stacker, so I've heard questions like yours a lot of times. Unfortunately there no perfect answers.
For starters, read the thread on "What Causes Halo?". It's important to recognize that some form of halo is inevitable because background next to foreground is never seen both in-focus and un-contaminated. When the foreground is focused the background is seen un-contaminated, but when the background is focused there's always a zone next to the foreground edge that is contaminated by out-of-focus foreground.
That said, some forms of halo can be eliminated altogether, and it's generally possible to compromise in a way that greatly reduces the visibility of what halos are left.
For this, read the tutorial "How To Use DMap" and watch the two video tutorials about retouching, all of which are linked on the main Tutorials index page on the Zerene Stacker website.
About softening the transition from in-focus to out-of-focus, your idea about shooting additional frames, stopped down, does work well when the taking lens has an adjustable aperture like you've described. Just be sure to get the exposure matched as well as possible. If you can't get it perfect, then make sure that Options > Preferences > Alignment > Brightness is selected. (It is selected by default.)
I'm not sure what you have in mind for preprocessing. Certainly it is a good idea to shoot raw and then tune the sharpness and noise reduction controls during raw development so as to strengthen real detail while suppressing noise.
However, that usually doesn't have much effect on "mist", which again, is usually due to the camera never seeing many parts as both sharp and uncontaminated.
Some people have successfully attacked the mist problem in post-processing, essentially using a localized levels adjustment to subtract out the otherwise residual out-of-focus components. But that's definitely an art form, highly dependent on the skill of the user.
As Charles says, we can probably help better if you post some images, showing us where you are now and what sorts of difficulties you're seeing.
--Rik
Thanks for the help guys.
Here's a problem shot with halo around the claw on the right (crab's left!) - I'm guessing it's the 'V' in the claw that compounds the problem here. The only strategy I can think of is to shoot at higher mag/ resolution to further diffuse the blur so the affected area is smaller. But this would require stack and stitch, which is a) a lot more work, and b) I haven't got a full rig for positioning the specimen. So I'd like to know if this strategy is worth pursuing before committing time and kit.

(Sony A7, Zuiko 80mm, Manfrotto 454, Ikea Jansjo + reflectors/ diffusers)
I've read the tutorials and a few threads and understand this, I'm just looking at strategies to minimise it. It's probably worth mentioning work and family commitments mean I've got limited time for the actual photography, but lots of time to think about it and read up.It's important to recognize that some form of halo is inevitable because background next to foreground is never seen both in-focus and un-contaminated. When the foreground is focused the background is seen un-contaminated, but when the background is focused there's always a zone next to the foreground edge that is contaminated by out-of-focus foreground.
Here's a problem shot with halo around the claw on the right (crab's left!) - I'm guessing it's the 'V' in the claw that compounds the problem here. The only strategy I can think of is to shoot at higher mag/ resolution to further diffuse the blur so the affected area is smaller. But this would require stack and stitch, which is a) a lot more work, and b) I haven't got a full rig for positioning the specimen. So I'd like to know if this strategy is worth pursuing before committing time and kit.
(Sony A7, Zuiko 80mm, Manfrotto 454, Ikea Jansjo + reflectors/ diffusers)
Okay thanks, I haven't graduated to microscope optics yet, but I'll bear it in mind. With the Zuiko 80/4 and 38/3.5 I can stop down fairly easily, the only problem being touching the setup during the stack, though I suppose I can limit it to the first and last images.Charles Krebs wrote:Adam,
As far as abrupt transitions from "sharp" to "out-of-focus" the idea of shooting a starting and ending image at a much smaller aperture can be quite effective. Unfortunately some of the optics used for high magnification stacking will not have adjustable apertures. You often need to compose with that in mind, or shoot much larger stacks than you really want and perhaps do some blurring in post.
Ah thanks, that's another problem I hadn't properly considered. With the higher mag stacks I've been using manual flash, so I'll have to make sure I've got sufficient power available.Just be sure to get the exposure matched as well as possible.
My remaining question is how ZS processes these areas which I want to incorporate but are not focused detail? My understanding is that it works by adding less blurred areas rather than subtracting the more blurred, so the less blurred areas will still get added right? I'm guessing PMax's frequency band approach should tackle this better than DMap, as DMap might require a lower threshold than ideal? Or have I not got my head around DMap properly yet?
Apologies for asking for help rather than experimenting, but I can get away with posting at forums at work whilst shooting or processing stacks might attract rather more attention!
Again, I'm just thinking out loud really, apologies for the half-formed braindump. My approach from traditional photography has been to try and get the starting files looking as correct as possible, but it struck me that, as most of the file will be discarded, there might be another approach. Thanks for the link, this bit stood out:I'm not sure what you have in mind for preprocessing.
I'm trying to think through a much simpler version basically - subtracting the lighter OOF areas. Take some black hairs against a white background for example. The blur/mist will be shades of grey. So before stacking, moving the white point into the grey it could be reduced. Guessing there might be some 'no free lunch' issue though, where the paler areas improve but darker areas get worse...Given full knowledge of those things, it's "conceptually straightforward" to correct for the contamination. You infer the 3D structure, figure out how much light came from OOF foreground, subtract that from the total amount originally sensed on focused background, then scale up whatever is left to compensate for the fact that the background was actually seen by only a fraction of the aperture.
-
Charles Krebs
- Posts: 5865
- Joined: Tue Aug 01, 2006 8:02 pm
- Location: Issaquah, WA USA
- Contact:
I think you will find that in most cases this will make the stacking problems worse. But of course, if you work through it all you will have an image with tremendous detail!The only strategy I can think of is to shoot at higher mag/ resolution to further diffuse the blur so the affected area is smaller. But this would require stack and stitch, which is a) a lot more work, and b) I haven't got a full rig for positioning the specimen. So I'd like to know if this strategy is worth pursuing before committing time and kit.
I don't know what the intended "end use" of the photo might be. Most of the time we try to obtain the highest resolution possible, which means using the largest aperture at which the lens performs well. But if you know that the image is to be used fairly small, you can afford to use a smaller aperture. The increased DOF (and lessening of blurry edges) will make for an easier and cleaner stack, but naturally resolution will take a hit.
-
rjlittlefield
- Site Admin
- Posts: 23626
- Joined: Tue Aug 01, 2006 8:34 am
- Location: Richland, Washington State, USA
- Contact:
To my eye the crab looks quite good, certainly at the resolution shown here. I think I can see some blurred areas where the crab itself would have had detail, but I'm not sure. Some crops that specifically show the problem areas, at higher resolution, maybe even marked up to point out the difficulties, would help us to understand the problem better.Adam Long wrote:Here's a problem shot with halo around the claw on the right (crab's left!)
Looking through a narrow gap will definitely cause problems. With a simple edge, at least half the aperture has an unobstructed view of background. But with a gap, there's no such limit. As the gap gets narrower or the background moves farther behind it, the amount of aperture that sees the background can get arbitrarily close to zero. This cuts down the contrast for background detail. At some point even PMax cannot find and preserve real detail because its contrast gets cut so low compared to pixel noise.I'm guessing it's the 'V' in the claw that compounds the problem here.
For dealing with a gap, a better approach is to go the opposite direction, using a narrow aperture so that a larger fraction of the aperture is able to see the subject through the gap. You take a hit in resolution due to diffraction, but in the area of the gap, this is better than losing the detail altogether. See "Reduced NA gives more detail", at http://www.photomacrography.net/forum/v ... hp?t=20238 .The only strategy I can think of is to shoot at higher mag/ resolution to further diffuse the blur so the affected area is smaller.
I do not recommend pursuing stack-and-stitch as a way of attacking any issues around halo. Stack-and-stitch is an effective way of getting more pixels than your camera sensor has in hardware, but that's about the only thing that it's good for.
Your understanding sounds perfect.My remaining question is how ZS processes these areas which I want to incorporate but are not focused detail? My understanding is that it works by adding less blurred areas rather than subtracting the more blurred, so the less blurred areas will still get added right? I'm guessing PMax's frequency band approach should tackle this better than DMap, as DMap might require a lower threshold than ideal? Or have I not got my head around DMap properly yet?
Another approach is to just use retouching, by brushing over the background using your stopped-down background image as source. That has the advantage that it does not accumulate pixel noise across all frames, as PMax is pretty much guaranteed to do.
--Rik
-
rjlittlefield
- Site Admin
- Posts: 23626
- Joined: Tue Aug 01, 2006 8:34 am
- Location: Richland, Washington State, USA
- Contact:
The only way to specify that would be to put the stopped-down image first, and at Options > Preferences > Alignment, select the option to "Align each frame against first frame separately". This requires Build T201605221655_beta or later.in Zerene can the stopped-down image act as a guide for the placement of the subsequent slices?
Two frames shot at the same focus setting will have the same perspective if (and only if) they have the limiting aperture in the same plane. This can be a problem if you shoot some frames wide open and others stopped down, because wide open and stopped down often have limiting apertures in different planes. But there should be no problem if you're working with say an f/2.8 lens that gets stopped to f/4 for aberration control in the main stack and then to f/16 at the end for reduced background blur.Wouldn't a stopped-down image have a different perspective than the later frames?
One more potential problem is that a stopped down image might get erroneously shifted, scaled, or rotated so as to appear better aligned with a corresponding image that really just has less DOF. At the moment this problem is hypothetical, since I cannot recall anybody reporting that it actually happened to them.
--Rik
Rik thanks for your answer. I had never noticed that setting in Zerene.
You said
You said
But most images of the stack are shot from a different place relative to the initial stopped-down image. Won't that cause problems?Two frames shot at the same focus setting will have the same perspective if (and only if) they have the limiting aperture in the same plane
Many thanks for the advice.
Here's a tighter crop of the problem area.

I've actually had another go at retouching this using the Dmap + Pmax for edges approach, which is definitely an improvement. The joint in the right claw is still an issue, and I haven't zoomed in any more as I find it is actually more noticeable in the wider view. Looking at the individual files it's clear ZS has done a fine job of pulling out what's there, and that the solution is probably to change the angle slightly. When positioning I was concentrating on having the tips of one claw just visible through the jaws of the other, which has come out well, but I guess in future I might be looking to avoid problem areas more.
Here's another one of a nettle:

The general mist around the trichomes bothers me, as well as the halo where the two leaves overlap at bottom right. I suppose again this is case of being aware of troublesome overlaps in the future, and avoiding them - the foreground leaf doesn't add much and could have been excluded. The mist is trickier though, up to now I've not used any Photoshop, just ZS and LR, so it could be case of doing some polishing in PS.
I should mention I was highly impressed with alignment job ZS did for this image - here's a crop of a dust mark trail showing how well my Manfrotto 454 was moving the camera, even after packing out with PTFE tape. I have since bought a linear stage...

Here's a tighter crop of the problem area.
I've actually had another go at retouching this using the Dmap + Pmax for edges approach, which is definitely an improvement. The joint in the right claw is still an issue, and I haven't zoomed in any more as I find it is actually more noticeable in the wider view. Looking at the individual files it's clear ZS has done a fine job of pulling out what's there, and that the solution is probably to change the angle slightly. When positioning I was concentrating on having the tips of one claw just visible through the jaws of the other, which has come out well, but I guess in future I might be looking to avoid problem areas more.
Here's another one of a nettle:
The general mist around the trichomes bothers me, as well as the halo where the two leaves overlap at bottom right. I suppose again this is case of being aware of troublesome overlaps in the future, and avoiding them - the foreground leaf doesn't add much and could have been excluded. The mist is trickier though, up to now I've not used any Photoshop, just ZS and LR, so it could be case of doing some polishing in PS.
I should mention I was highly impressed with alignment job ZS did for this image - here's a crop of a dust mark trail showing how well my Manfrotto 454 was moving the camera, even after packing out with PTFE tape. I have since bought a linear stage...
Great, I'll definitely be experimenting with this approach. Is shooting an f/16 image at the front AND back of the stack likely to cause issues?But there should be no problem if you're working with say an f/2.8 lens that gets stopped to f/4 for aberration control in the main stack and then to f/16 at the end for reduced background blur.
-
Charles Krebs
- Posts: 5865
- Joined: Tue Aug 01, 2006 8:02 pm
- Location: Issaquah, WA USA
- Contact:
Adam,
Your approach is good... checking to see what can be done to eliminate "problem" areas when stacking. Once you work with this awhile awhile you will start to recognize compositions that, with just a little tweaking can avoid a lot of grief with the stacking result. But the nature of this type of work means that there will very likely be additional editing that will need to be done after the stacking program.
For example, find the most egregious example of your nettle trichome "haze". Run a small stack containing only the source files needed for the detail in that trichome(s), and then edit it into the initial full stack in Zerene.
Your approach is good... checking to see what can be done to eliminate "problem" areas when stacking. Once you work with this awhile awhile you will start to recognize compositions that, with just a little tweaking can avoid a lot of grief with the stacking result. But the nature of this type of work means that there will very likely be additional editing that will need to be done after the stacking program.
It is a rare stack that will not require some pixel editing in something like Photoshop. One thing you may find that can be a big help is to do "partial stacks" and retouch them into the final image. Some people like to do "slabbing" where an ancillary program or routine breaks a large stack down into smaller segments. My personal experience with this has been mixed. What I prefer is to run a full stack and then study the result carefully for the problem areas. Then I make a note of the source files numbers that contain (if any!) the parts that need additional work. Run those sections (try both Pmax and Dmap), and then retouch them into the initial overall shot as needed. (You might consider this a "targeted" slabbing). Zerene makes this quite easy to do and it can be extremely effective and save lots of "clean-up" in Photoshop., up to now I've not used any Photoshop, just ZS and LR, so it could be case of doing some polishing in PS.
For example, find the most egregious example of your nettle trichome "haze". Run a small stack containing only the source files needed for the detail in that trichome(s), and then edit it into the initial full stack in Zerene.
-
rjlittlefield
- Site Admin
- Posts: 23626
- Joined: Tue Aug 01, 2006 8:34 am
- Location: Richland, Washington State, USA
- Contact:
Adam, let me start by saying that I've looked at a lot of stacked results, and yours are very good already. The remaining problems that you're wrestling with will be difficult to clean up as well as you'd probably like.
That said, I'm still struggling to understand some of exactly what you're looking at.
I've marked up this crop to indicate a couple of different things that I can imagine you mean by "haze".
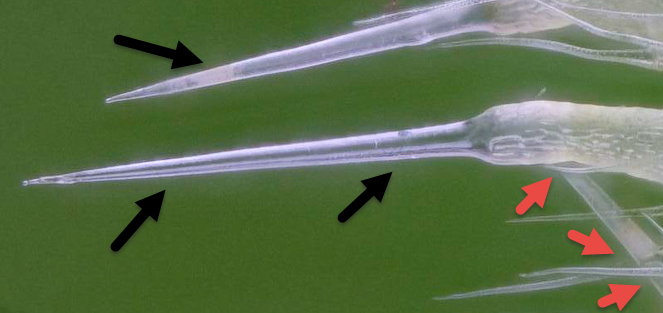
The black arrows point to areas where the lens saw a clean view of unobstructed background when the edge was in focus. Those areas could be rendered cleanly by using DMap with a contrast threshold set high so as to concentrate on the high contrast edges, making all other background go "black in preview".
But the red arrows point to areas where the lens never did see a clean view of the background. In those corners that are close to both foreground and background, the lens always sees background that has been contaminated (lightened, in this case) by either OOF foreground or OOF background. I am not aware of any automatic method, in any software, to make those areas be rendered the same color as background that has not been contaminated.
--Rik
That said, I'm still struggling to understand some of exactly what you're looking at.
I've marked up this crop to indicate a couple of different things that I can imagine you mean by "haze".
The black arrows point to areas where the lens saw a clean view of unobstructed background when the edge was in focus. Those areas could be rendered cleanly by using DMap with a contrast threshold set high so as to concentrate on the high contrast edges, making all other background go "black in preview".
But the red arrows point to areas where the lens never did see a clean view of the background. In those corners that are close to both foreground and background, the lens always sees background that has been contaminated (lightened, in this case) by either OOF foreground or OOF background. I am not aware of any automatic method, in any software, to make those areas be rendered the same color as background that has not been contaminated.
It seems like that should be fine, but I can't think of any examples to point to.Is shooting an f/16 image at the front AND back of the stack likely to cause issues?
--Rik
-
rjlittlefield
- Site Admin
- Posts: 23626
- Joined: Tue Aug 01, 2006 8:34 am
- Location: Richland, Washington State, USA
- Contact:
Lou, you wrote:
From my standpoint, we got here because you asked "can the stopped-down image act as a guide for the placement of the subsequent slices? Wouldn't a stopped-down image have a different perspective than the later frames?"
I made the mistake of trying to formulate some reasonable answer without fully understanding whatever you were thinking about. In retrospect, I now think I should have started by asking you to spell that out in a lot more detail.
So rather than further muddy the issues, I'll just ask now.
Please explain in a lot more detail what it means to "act as a guide", and what sort of workflow you have in mind that would exploit that concept.
--Rik
I think we need back up.But most images of the stack are shot from a different place relative to the initial stopped-down image. Won't that cause problems?rjlittlefield wrote:Two frames shot at the same focus setting will have the same perspective if (and only if) they have the limiting aperture in the same plane
From my standpoint, we got here because you asked "can the stopped-down image act as a guide for the placement of the subsequent slices? Wouldn't a stopped-down image have a different perspective than the later frames?"
I made the mistake of trying to formulate some reasonable answer without fully understanding whatever you were thinking about. In retrospect, I now think I should have started by asking you to spell that out in a lot more detail.
So rather than further muddy the issues, I'll just ask now.
Please explain in a lot more detail what it means to "act as a guide", and what sort of workflow you have in mind that would exploit that concept.
--Rik