componon-s

A forum to ask questions, post setups, and generally discuss anything having to do with photomacrography and photomicroscopy.

Moderators: rjlittlefield, ChrisR, Chris S., Pau

Amro
Posts: 10
Joined: Fri Jan 17, 2014 1:37 am

componon-s

Post by Amro »

my first tests withe the 50 mm componon -s
looks the x2 magnification is worse than the x3 magnification
any ideas? tips for better results?

magnification x1.5-2X
f: 5.6
STEP: 90 micron
2 flashes with polystrene diffuser
stacked in zerene stacker
normal quality: https://flic.kr/p/qB41GV

Image

magnification x3
f: 5.6
STEP: 60 micron
2 flashes with polystrene diffuser
stacked in zerene stacker
normal quality: https://flic.kr/p/qjNzvc
Image

Cactusdave
Posts: 1631
Joined: Tue Jun 09, 2009 12:40 pm
Location: Bromley, Kent, UK

Post by Cactusdave »

Some gorgeous colour in these and lot's of detail, but I think they could do with a a bit of a contrast boost and a light sharpen to make them really all they could be. With your permission I could post versions I've done this to, or I can email them to you.
David
Leitz Ortholux 1, Zeiss standard, Nikon Diaphot inverted, Canon photographic gear

Amro
Posts: 10
Joined: Fri Jan 17, 2014 1:37 am

Post by Amro »

ok david feel free to do that :D

Cactusdave
Posts: 1631
Joined: Tue Jun 09, 2009 12:40 pm
Location: Bromley, Kent, UK

Post by Cactusdave »

Thanks Amro. These are my edits. The images from your flickr links were taken into Photoshop Elements 11 and subject first to contrast enhancement with the Topaz Clarity plugin using, the Macro ---> insect wings preset. They were then smart sharpened with Topaz Detail 3 using the Overall Detail Light II preset with a small pull back of the Highlights slider. Finally after resizing and saving for web within Photoshop, the images were lightly resharpened using Adjust Sharpness with settings of 80% and radius 0.5pixels as saving for web can soften the images as part of the process.

Image


Image


I was impressed with the detail and sharpness of your images at this magnification point, and hope this illustrates this for you. I know it is easy to over process images, and the great thing with tools like this is that it is easy to pull back effects if you feel they have gone too far.
Leitz Ortholux 1, Zeiss standard, Nikon Diaphot inverted, Canon photographic gear

rjlittlefield
Site Admin
Posts: 23626
Joined: Tue Aug 01, 2006 8:34 am
Location: Richland, Washington State, USA
Contact:

Post by rjlittlefield »

Cactusdave wrote:the great thing with tools like this is that it is easy to pull back effects if you feel they have gone too far.
Hhmm... As a counterpoint...

No offense intended to Dave, but just personally I would say that these edits have already gone several steps too far. To my eye, these latter images have been sharpened and contrast enhanced to the point that they no longer reflect a realistic appearance of the subject but instead have become something of a garish caricature of what I imagine the fly and the leaf actually looked like.

Amro, can you be more specific about what you mean here: "looks the x2 magnification is worse than the x3 magnification" ?

If you're talking about sharpness when pixel-peeping, then how about showing us some actual-pixel crops (not resized) to illustrate what you mean? (See HERE for illustration of what I mean by "actual-pixel crops".)

Cactusdave
Posts: 1631
Joined: Tue Jun 09, 2009 12:40 pm
Location: Bromley, Kent, UK

Post by Cactusdave »

As always I respect and value your opinion Rik.
Leitz Ortholux 1, Zeiss standard, Nikon Diaphot inverted, Canon photographic gear

rjlittlefield
Site Admin
Posts: 23626
Joined: Tue Aug 01, 2006 8:34 am
Location: Richland, Washington State, USA
Contact:

Post by rjlittlefield »

Right, so, lest my comment come across as harsher than intended, let me illustrate what I'm talking about.

Here's an animated GIF that alternates between Amro's original and Cactusdave's edit:

Image

Now, if I were publishing a calendar, I'm pretty sure which one of these would sell better -- the edit.

But I can't convince myself that the real fly and the real leaf had that much contrast, saturation, and sharpness, so to my eye the edit screams overprocessed.

Ultimately what's "better" depends on what effect the photographer is going for.

But I'm mindful that Amro started out this topic with a question that appears to focus on lens behavior, so I want to make sure that such strong processing is understood in context.

--Rik

GemBro
Posts: 261
Joined: Wed Aug 20, 2014 5:20 pm
Location: Surrey [UK]

Sharpening Using High Pass

Post by GemBro »

Agree with all comments here ... it's the end product and environment and how the images will be viewed, that matters ...

I'm one of those who tends to add subtle enhancements and very rarely use 3rd party filters ... I'm a blender and use Photoshops inbuilt filters with full control ... mostly with Photoshoots and portraits/faces ...

Sharpening Using High Pass:
To do a simple sharpen you don't need to use Photoshops obvious Sharpen filter as this tends to sharpen across the plane ... use High Pass instead ... then blend that sharpness onto your original layer by using the Opacity control on the layer ...

1. Duplicate your original subject layer (always good practice) ... then right click on that layer and select Duplicate Layer
2. On the duplicated layer right click on it and select Convert to Smart Object and call that layer Sharpness
3. Now select Filter -> Other -> High Pass ... and tick the preview box
4. Adjust the Radius so that you just get an outline, of your subject, showing through the grey tone (then click OK)
5. Select the Sharpness layer and then select the Blend Mode to OVERLAY

By switching the Sharpness layer on and off you should see the subtle sharpness applied to your subject... and because you turned that layer into a Smart Object you can now go back (by double clicking on that layer) and re-adjust the Radius without having to go through the process again ... this time add more value to the Radius, you can over shoot a little at this point (then click OK) ... now you should see a more vivid sharpened image ... you can now adjust this 'shaprness' by using the opacity control for that layer ... pull it back to about 50% and go from there ...

At this point you could also add a Mask on the Sharpness layer and then mask out particular points you want your viewers to be drawn to ...

Remember when you sharpen an image it also gets slightly brighter and more contrasty, so most of the time you may not need to adjust those parameters ... but again, if you need to, make it subtle ... but, as always, it depends on what you are going for ...

Gem
Last edited by GemBro on Sun Jan 04, 2015 4:57 pm, edited 1 time in total.
Canon 550D(T2i) ML (Nightly Builds) | Canon 5D MKII | Raynox 250 | Palinar 35mm f2.8 (reversed) | EL-Nikkor 50mm f2.8 N | EL-Nikkor 50mm f4 N | EL-Nikkor 50mm f4 | Bellows | Objectives: LOMO 3.7x 0.11 : 8x 0.20 : 40x 0.65
RiG II - 'Bamboo': Olympus CH Focus Block with Inverted Arca/Swiss | Canon 430 EX (x2) | Olympus T20 flash (x2) | Youngnuo YN-622C Wireless triggers (x3) | Ikea Jansjo 3W LED Lighting (x3)
Stepper Motor Focusing System (Helicon Remote)

Amro
Posts: 10
Joined: Fri Jan 17, 2014 1:37 am

Post by Amro »

rjlittlefield:
I didn't understand what you mean by actual pixel cropped not re sized
i read the link you send but didn't understand how to do that
im hardly using lightroom and a macro beginner
half of your words above i didn't understand
I talked about general sharpness contrast and clarity
it was worse in the x2 result compared to the x3 one

ChrisR
Site Admin
Posts: 8671
Joined: Sat Mar 14, 2009 3:58 am
Location: Near London, UK

Post by ChrisR »

Sorry I don't use have Lightroom.
I'll have a try with what are bound to be different words than Rik's. :D But he'll be back.

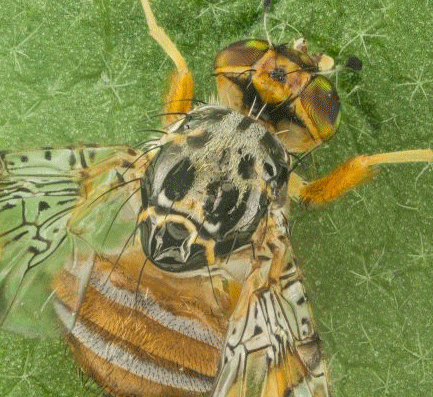
Your camera sensor will be some 5000 or so pixels wide, but the forum can only display 1000, approx. So if you shrink an image to fit, 5 pixels widthwise become one. That can make edges come up nice and sharp, but small details, like the hairs on the fly's abdomen, can become only one or two pixels across. That's too few pixels to look like anything much. If sharpening is applied to make them show up more, it all tends to look "processed".
If the contrast is down a bit ( which might be expected) then details are just plain lost when the image is shrunk. Upshot - we can't see very well, what detail you've got.
To find out what tones the lens has actually put onto the sensor, we need to see the pixels, without the shrinking stage.

If the image is 5000 wide and the screen is 1000, then the image is 5 times bigger than the screen. But that's OK, just crop everything else off leaving eg the middle, or an edge to look at. At that scale, which is a sort of standard, it's much easier to see what's going on. If necessary we can zoom the screen (Ctrl+mouse-zoom-wheel) to look in really close.

If the "clarity" is down , such as perhaps in your 2x image, then it's often best to adjust the contrast it while looking at pixel level. Small-detail contrast, is adjusted by using sharpening, whether by a built-in tool or GemBro's method.

Post Reply Previous topicNext topic