This, in another forum, seems to have some relevance:
http://www.fredmiranda.com/forum/topic/703424
Harold
Cremaster of Monarch butterfly pupa
Moderators: rjlittlefield, ChrisR, Chris S., Pau
-
Harold Gough
- Posts: 5786
- Joined: Sun Mar 09, 2008 2:17 am
- Location: Reading, Berkshire, England
-
rjlittlefield

- Site Admin
- Posts: 23608
- Joined: Tue Aug 01, 2006 8:34 am
- Location: Richland, Washington State, USA
- Contact:
It does, though there are important differences in the setups.
Brian's setup is shown on page 2 of the thread that you link; a picture of it is HERE.
What really matters is the angular coverage of the light source, as seen by the subject. Absolute size of the diffuser makes no difference whatsoever.
Although Brian's diffuser appears "big" compared to the size of the subject, it's still pretty small in terms of angular coverage -- an isolated bright area covering well under 1/10 of a hemisphere. That's why the whole left side of the raisin looks dark, with no detail visible.
In the setups that I'm using, the diffuser wraps around the subject. In the case of the pingpong ball, it covers the entire front hemisphere, minus the hole that the objective sticks through. The packing foam covered a smaller area, something closer to the lower half of the front hemisphere as seen in the posted photos.
Because of Brian's relatively small diffuser (measured as angular coverage), all of his pictures have shadows that are rather large and dark, and highlights that are rather small and bright, compared to what's produced by the wrapped diffuser approach. So you can't really compare the pictures themselves.
His illustration of the differences between diffusing materials is very relevant, however, in that some of his materials are clearly not spreading out the light so as to make the entire surface of the diffuser appear equally bright to the subject. I notice in particular that his "Styrofoam packing liner" and plastic milk carton seem notably less effective than any of the paper products.
I have not run a controlled comparison of different materials, but I do know that I've always gotten good results from kleenex tissue, in contrast to the current case where the plastic packing material did not do a good job. This would be consistent with Brian's results.
Thanks for the link.
--Rik
-
Harold Gough
- Posts: 5786
- Joined: Sun Mar 09, 2008 2:17 am
- Location: Reading, Berkshire, England
Here is what can be done when lighting is mastered:
http://www.fredmiranda.com/forum/topic/705144
Harold
http://www.fredmiranda.com/forum/topic/705144
Harold
My images are a medium for sharing some of my experiences: they are not me.
-
rjlittlefield
- Site Admin
- Posts: 23608
- Joined: Tue Aug 01, 2006 8:34 am
- Location: Richland, Washington State, USA
- Contact:
-
Harold Gough
- Posts: 5786
- Joined: Sun Mar 09, 2008 2:17 am
- Location: Reading, Berkshire, England
Not that would help.
This is the sort of subject that this was designed for:
http://www.alanwood.net/photography/oly ... r-pol.html
Harold
This is the sort of subject that this was designed for:
http://www.alanwood.net/photography/oly ... r-pol.html
Harold
My images are a medium for sharing some of my experiences: they are not me.
-
rjlittlefield
- Site Admin
- Posts: 23608
- Joined: Tue Aug 01, 2006 8:34 am
- Location: Richland, Washington State, USA
- Contact:
That's an interesting device. I've used cross polarizers before for macro work. (2nd picture HERE, for example, shooting a waterlouse through rippled water.)
But I've never figured out how to do it with wrap-around diffusion. This ring-flash polarizer should suggest some possibilities. Thanks!
It's far from clear that crossed polarizers would help with the cremaster, though. The polarizers are remarkably effective at eliminating surface reflections. Unfortunately, these bulk chitin structures tend to not produce any reflections except from their surfaces. Killing the surface reflections just makes them go dark, giving little indication of shape except for their outline. See the lower right quad of the second panel HERE for illustration and for comparison against broadly diffused lighting.
--Rik
-
augusthouse

- Posts: 1195
- Joined: Sat Sep 16, 2006 1:39 am
- Location: New South Wales Australia
Rik,
I was wondering how you had the bubblewrap arranged for the first shot. The reason I asked, is because looking at the second shot, I keep wondering how a 'cylinder' type diffuser would have performed as opposed to the half-ball pingpong ball diffuser?
http://www.visionarydigital.com/diffusers.html
Now, how do you think the Monarch does its little trick? Shake, rattle and roll? Do you think he lets go to some extent for a millisecond?
Craig
To use a classic quote from 'Antz' - "I almost know exactly what I'm doing!"
-
rjlittlefield
- Site Admin
- Posts: 23608
- Joined: Tue Aug 01, 2006 8:34 am
- Location: Richland, Washington State, USA
- Contact:
Craig,
The main issue is the quality of the diffuser, not its shape.
These pictures should clarify.
First, the setups.
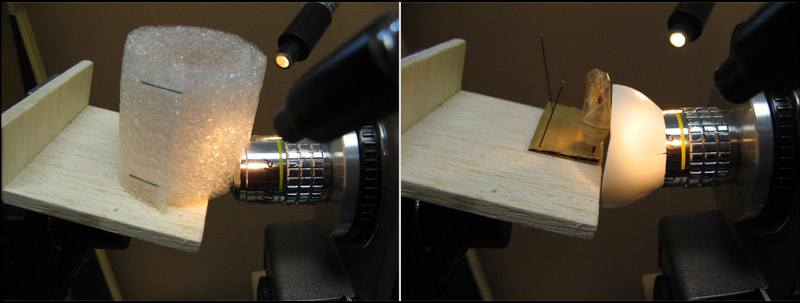
Now the diffuser quality.
2 layers of fine bubble-wrap on the left, 2 layers of Kleenex tissue on the right.
Side view on the top, front view in the middle, front view very close to diffuser on the bottom.
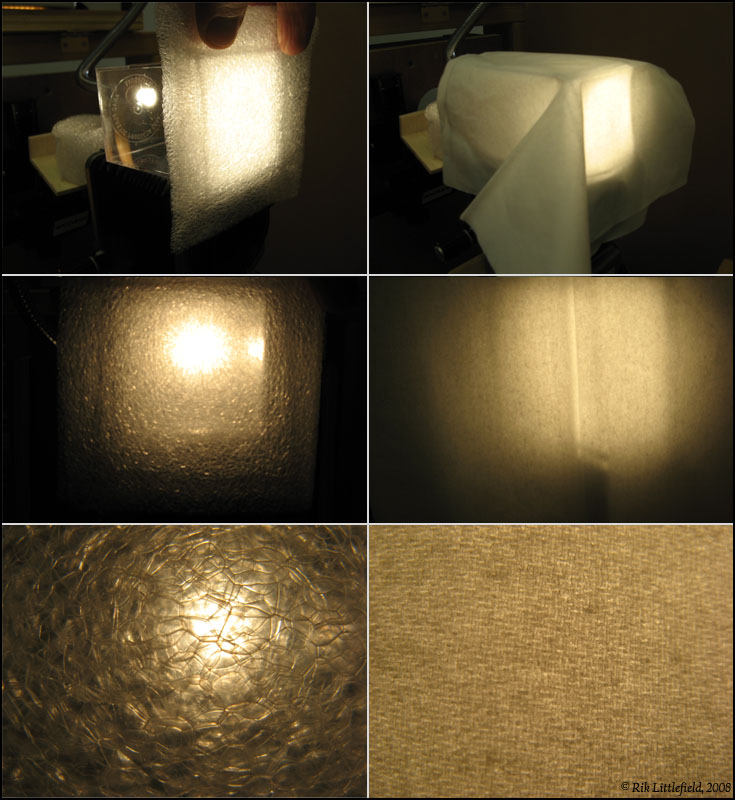
As you can see, the fine bubble-wrap appears to be a perfectly reasonable diffuser when seen from the side.
But look through it, and you see the truth. Get close to it, as the cremaster was, and its deficiencies become blatant.
I won't be using the bubble-wrap material again.
--Rik
The main issue is the quality of the diffuser, not its shape.
These pictures should clarify.
First, the setups.
Now the diffuser quality.
2 layers of fine bubble-wrap on the left, 2 layers of Kleenex tissue on the right.
Side view on the top, front view in the middle, front view very close to diffuser on the bottom.
As you can see, the fine bubble-wrap appears to be a perfectly reasonable diffuser when seen from the side.
But look through it, and you see the truth. Get close to it, as the cremaster was, and its deficiencies become blatant.
I won't be using the bubble-wrap material again.
--Rik

-
rjlittlefield
- Site Admin
- Posts: 23608
- Joined: Tue Aug 01, 2006 8:34 am
- Location: Richland, Washington State, USA
- Contact:
It's more like how many times the light gets bounced around, when going through the material. More fibers or bubbles in the same thickness is probably a good thing, but if the material gets thinner at the same time it gets finer, there may not be much overall change.
I reviewed lauriek's posting HERE, then rummaged through my own stock of foam to see what I had that looked similar.
I found one big sheet that looked identical. It has much finer grain than what I tested the first time, but it's also thinner.
When I tested this new stuff, here is what I found:
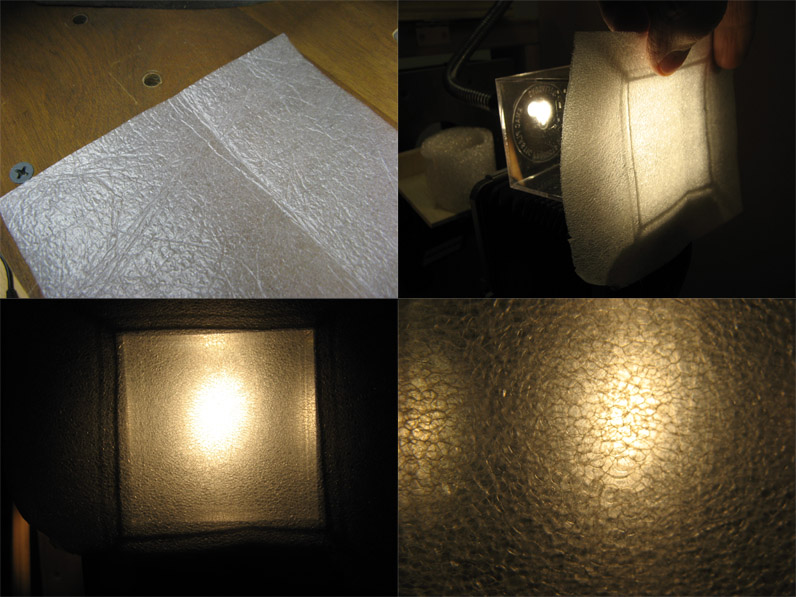
As you can see, this finer but thinner foam doesn't make a huge improvement. It's somewhat better than the coarser thicker foam, but it is still far inferior to the kleenex tissues.
--Rik
I reviewed lauriek's posting HERE, then rummaged through my own stock of foam to see what I had that looked similar.
I found one big sheet that looked identical. It has much finer grain than what I tested the first time, but it's also thinner.
When I tested this new stuff, here is what I found:
As you can see, this finer but thinner foam doesn't make a huge improvement. It's somewhat better than the coarser thicker foam, but it is still far inferior to the kleenex tissues.
--Rik
-
Harold Gough
- Posts: 5786
- Joined: Sun Mar 09, 2008 2:17 am
- Location: Reading, Berkshire, England
If "diffusion" is obtained by reflection it might matter.rjlittlefield wrote: The main issue is the quality of the diffuser, not its shape.
Rik
The following is a fact. Make of it what you will for the context of this string:
There was a problem getting colonies of honey bees to navigate when confined in huge buldings (aircraft hangers , or whatever) with no natural light penetration. If artifical light was refected off crumpled metal foil the patterns of polarized light were sufficient for bees to navigate by. They nomally navigate by such patterns in the sky originating from the sun.
Harold
My images are a medium for sharing some of my experiences: they are not me.
-
rjlittlefield
- Site Admin
- Posts: 23608
- Joined: Tue Aug 01, 2006 8:34 am
- Location: Richland, Washington State, USA
- Contact:
OK, the truth can now be told...rjlittlefield wrote:To help imagine how striking this process is, see NikonUser's excellent pictures of the entire Monarch pupa, HERE.... The caterpillar spins this silk mat. Then it works the hooks on its hind feet into the silk mat. It lets go with everything else and hangs there while the pupa develops inside the caterpillar's skin. The hooks that you see here are part of that pupa, and they form entirely inside the old skin. Hold that thought.
Now, don't blink.
Oops, you blinked!
While you were blinking, the pupa emerged from the old skin, and while hanging without obvious support, worked its cremaster hooks into the silk mat, then knocked the old skin onto the ground underneath. How did it do that??!!
The problem is roughly akin to taking off your pants while wearing a straitjacket and hanging by your knees from an overhead bar.
The cremaster shown above is just that little black prong at the top end of the pupa.
Somehow that large, smooth no-appendages pupa manages to hang onto the remains of the old caterpillar skin, while moving its cremaster from inside the skin, to outside the skin, then working it around to be thoroughly entangled in the silk mat.
How does it do that? It's magic!
While searching for something entirely different this evening, I ran across several YouTube videos that illustrate how the monarch caterpillar/pupa pulls off this trick. See the following references (min:sec)
http://www.youtube.com/watch?v=LY-Fiyq8jc4 0:55
http://www.youtube.com/watch?v=vxPz2GxB6PU 5:17
http://www.youtube.com/watch?v=pLarnRoFlS8 5:47
Very briefly... While the pupa is shedding the caterpillar skin, it is suspended by the skin's last set of legs, which are still sunk into the silken mat. At the last moment, the pupa hangs onto the skin with structures that are essentially what's left of the prolegs, while pulling its Velcro-style cremaster out of the skin to the outside, up around the skin to the silken mat, and squiggling it around to get it thoroughly embedded in the mat. Then it gyrates furiously, which sinks the hooks of the cremaster even more thoroughly into the mat, and in the process dislodges the skin. Some few seconds later, the pupa is hanging by itself from its cremaster, and the skin is lying on the ground underneath.
I have watched this process in detail with other species, and I think it is the same here. Understanding how the process really works strikes me as rather like understanding how rainbows form -- the beauty is not diminished by knowing the details of what's going on.
I hope you find this interesting also.
--Rik

Here's the lighting arrangement this fellow used.Harold Gough wrote:Here is what can be done when lighting is mastered:
http://www.fredmiranda.com/forum/topic/705144
Harold
http://www.fredmiranda.com/forum/topic/675134/2#6352600
Remarkable effective for remarkably little money! To me, this illustrates the importance of the size of the light source in an angular sense but there are other factors at play, such as the propensity of the material to scatter light of course.
A difficult balance is the degree of light source specularity (which tends to provide more detail shadowing and detail contrast) vs its diffuseness which liberates one from many of the offensive specular highlights that shiny bugs provide. If it were as simple as wanting a flat, highly diffuse light, perhaps a ring light would be all that is needed for ordinary macro photography.
Perhaps an ideal light source would have an adjustable ratio of specular and diffuse lighting, which probably means an adjustable size to the diffuse section.
Also, sometimes one would prefer lighting from a single side so as to create some nice dramatic shadows for the plant background for a living insect/bug/critter. While less realistic and less documentary, such lighting is often enjoyable from an aesthetic standpoint.
Just my two euros/cents.
-Phil
"Diffraction never sleeps"
"Diffraction never sleeps"
-
rjlittlefield
- Site Admin
- Posts: 23608
- Joined: Tue Aug 01, 2006 8:34 am
- Location: Richland, Washington State, USA
- Contact:
Not to quibble, but it's a myth that ring lights are highly diffuse. They are flat in the sense that there's no preferred angle to the illumination, and they are shadowless in the sense that bumps and depressions tend not to cast shadows that can be seen by the camera.DQE wrote:If it were as simple as wanting a flat, highly diffuse light, perhaps a ring light would be all that is needed for ordinary macro photography.
But if you shoot a picture of a shiny subject, what you'll see is a hard-edged specular reflection, distorted of course by irregularities in the shape of the surface. If your subject is something roughly spherical or cylindrical, then the edges will go black.
I shudder to think of what a ring light would do with the headlamp filament HERE, considering that I had to virtually surround that thing with diffusers and reflectors to keep large swaths from going too dark to be seen.
--Rik