BSFL mouthparts -- a miniature "tunnel boring machine"

Images taken in a controlled environment or with a posed subject. All subject types.

Moderators: rjlittlefield, ChrisR, Chris S., Pau

rjlittlefield
Site Admin
Posts: 23605
Joined: Tue Aug 01, 2006 8:34 am
Location: Richland, Washington State, USA
Contact:

BSFL mouthparts -- a miniature "tunnel boring machine"

Post by rjlittlefield »

These are mouthparts of a Black Soldier Fly Larva (BSFL). A recent technical paper (linked below) says that The mouthparts resemble a "tunnel boring machine". That description sounds good to me.

These images are best appreciated in stereo, because in most views the combination of 3D geometry and surface coloration makes the structure almost impossible to figure out from a single view.

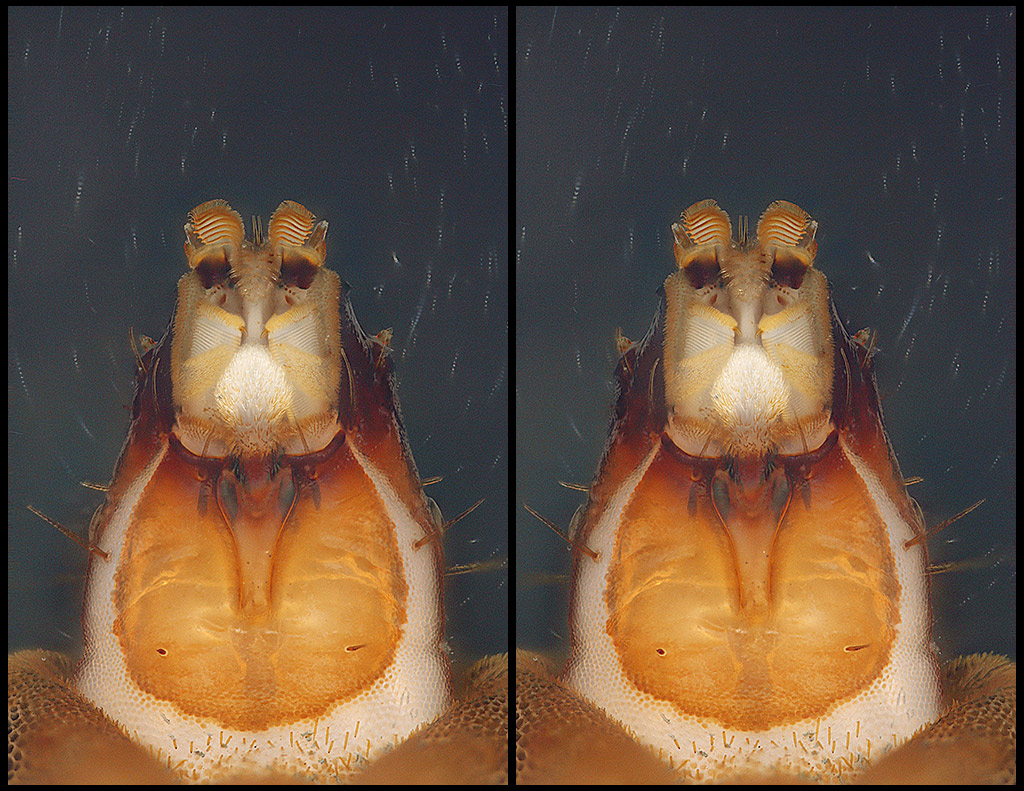
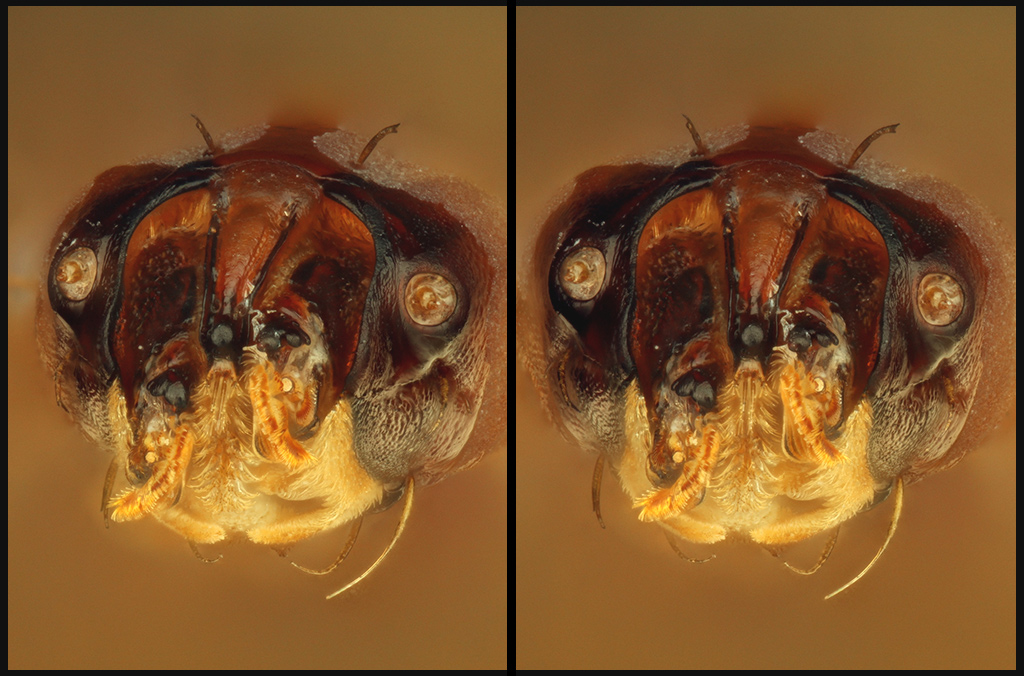
But let's start with a view that is simple enough to work even as a single image.

This is a slightly oblique ventral pose ("underside, looking up"), showing the entire head. This is almost a whole APS-C frame shot at 10X magnification, so a little over 2 mm from bottom to top.

Image

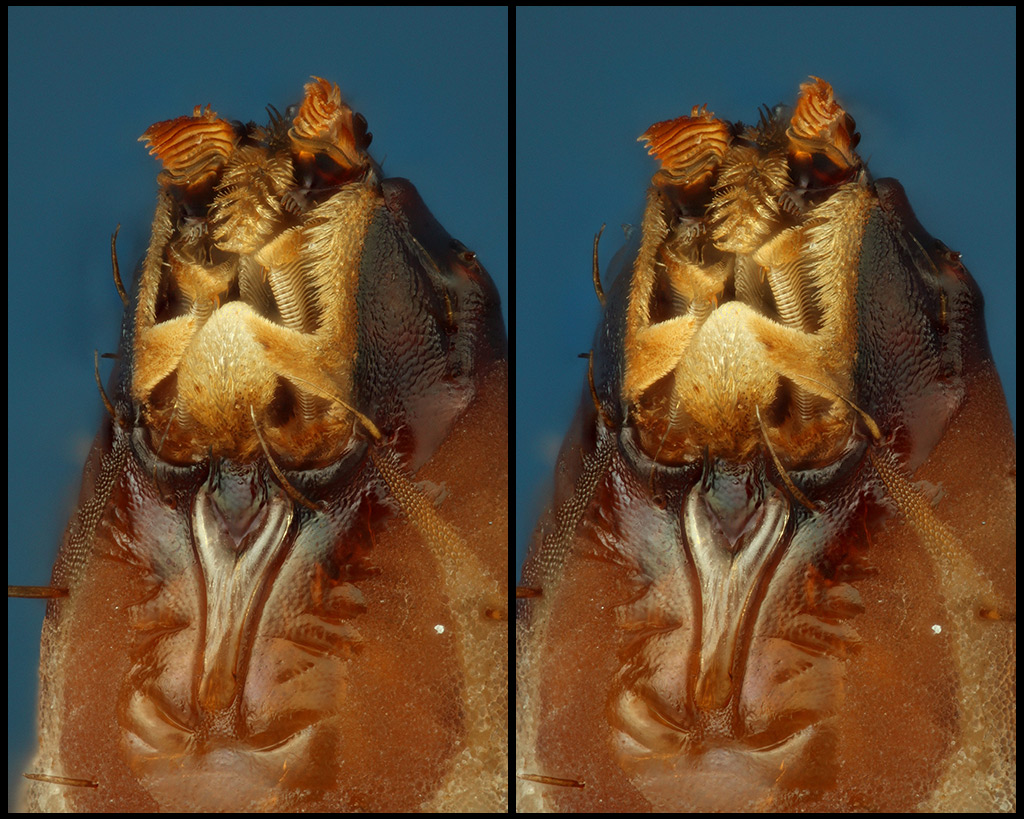
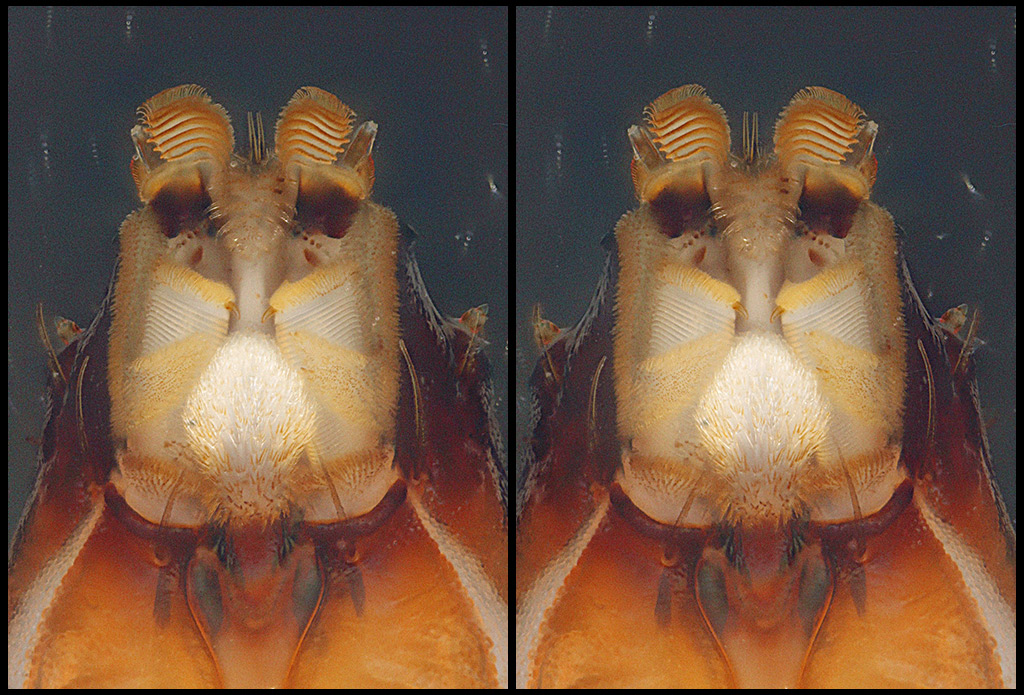
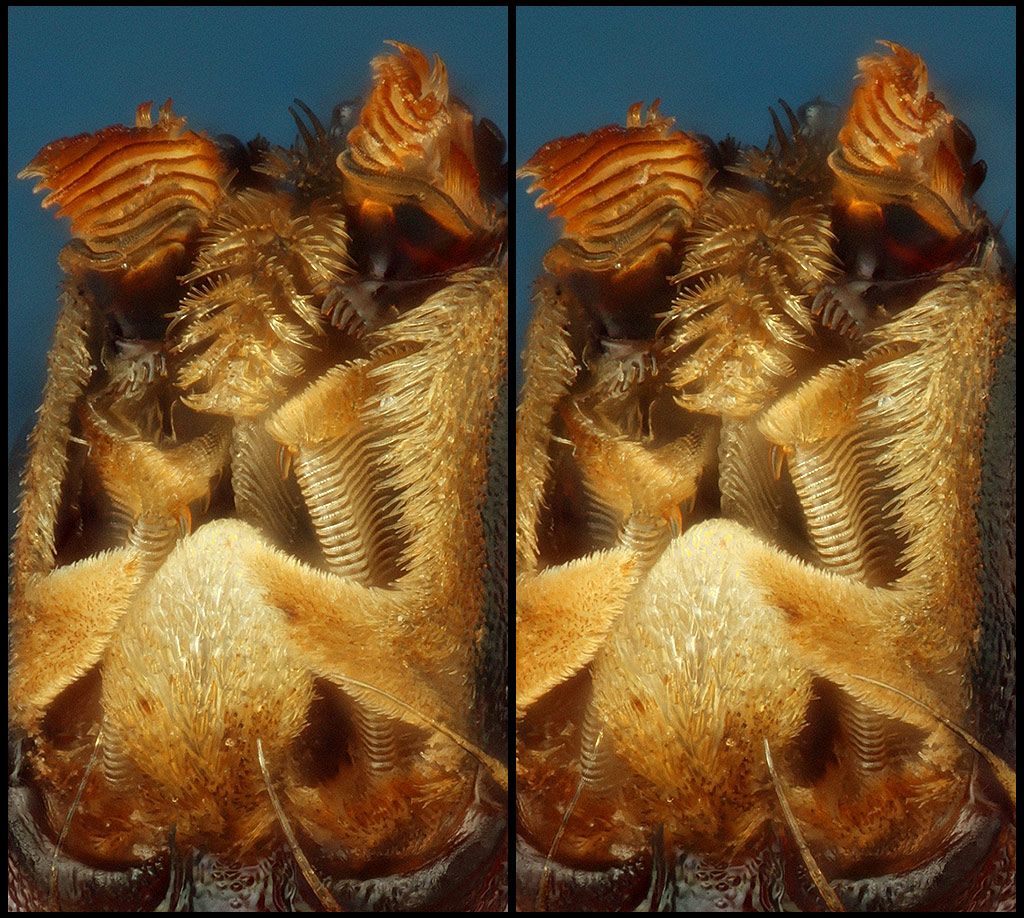
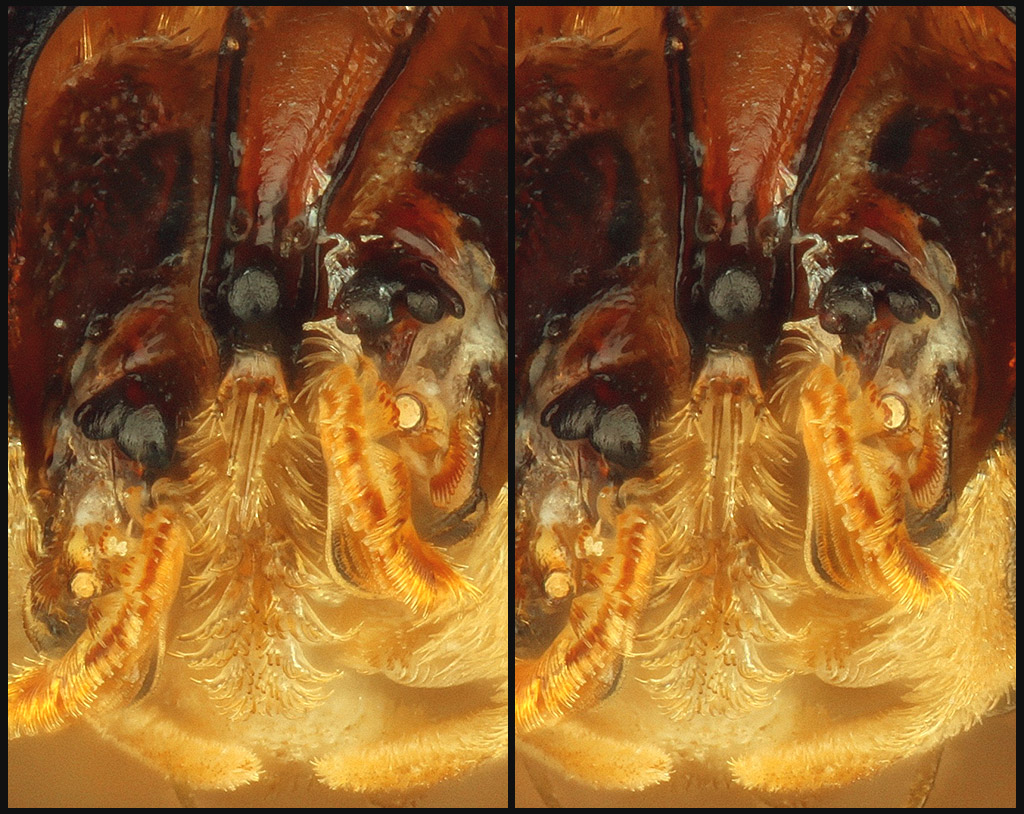
Following is a closer crop of the same image.

Image

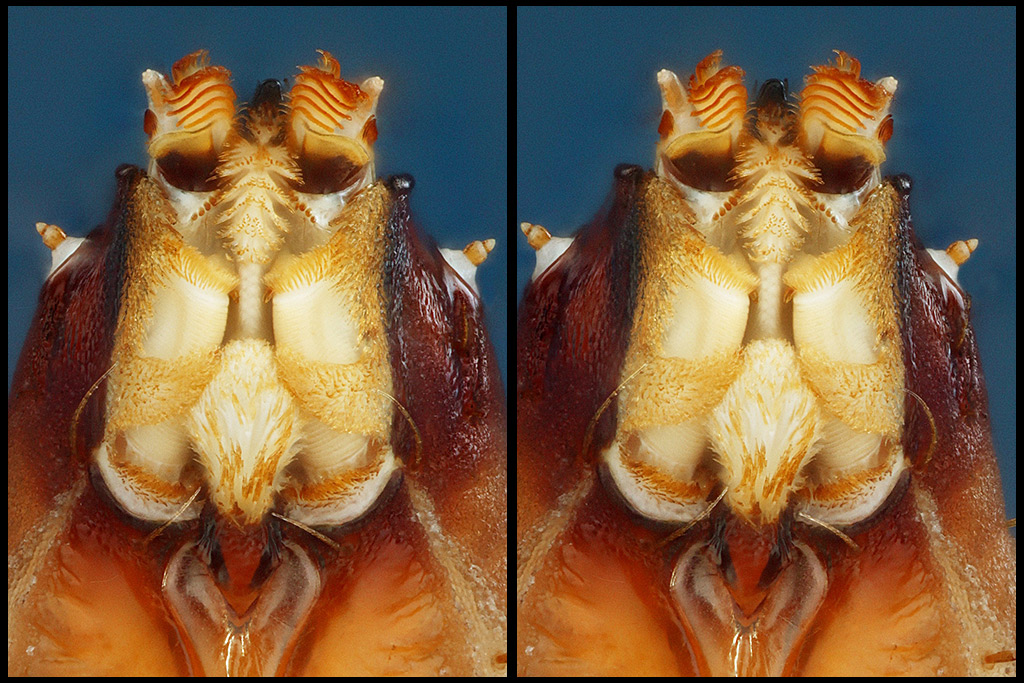
Now, the dorsal view ("above, looking down").

Image

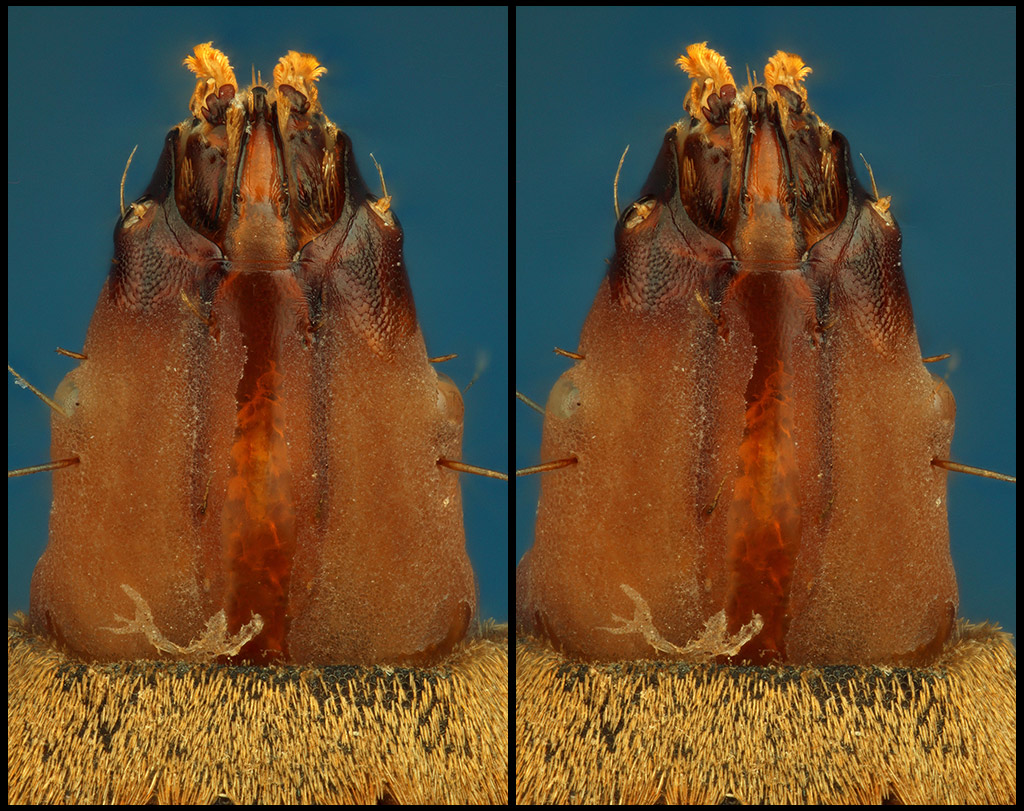
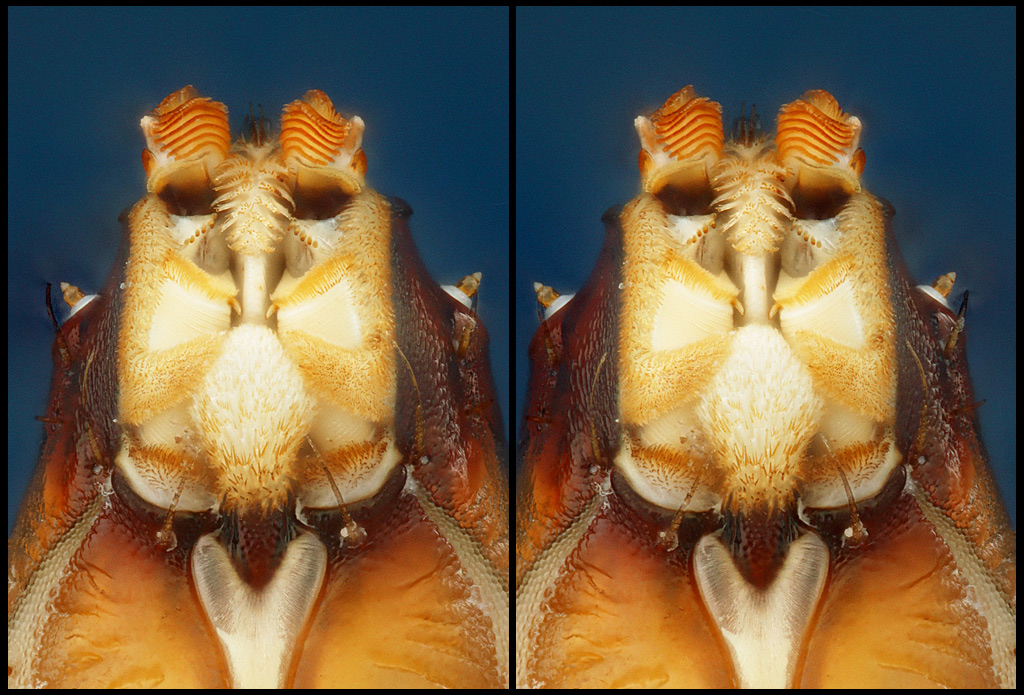
Following, a closer crop.

Image

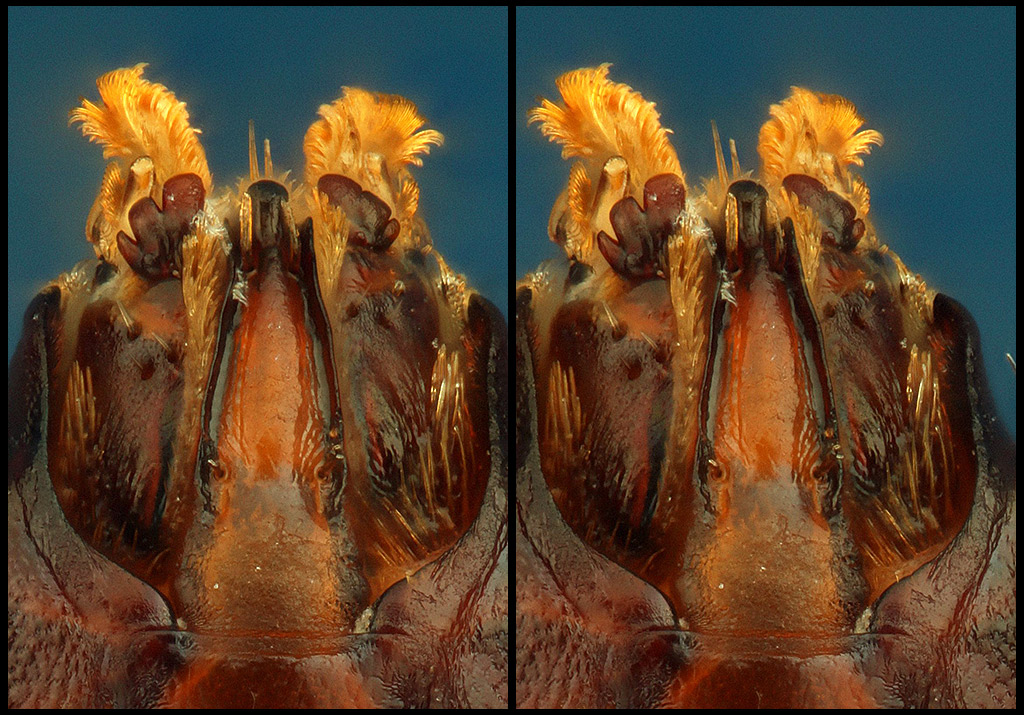
Finally, here is the frontal view, looking into the face. The two "eyes" are actually antennae in their sockets.

Image

Image

The technical paper that I mentioned is "An in-depth description of head morphology and mouthparts in larvae of the black soldier fly Hermetia illucens", Daniele Bruno et.al, Arthropod Structure & Development 58 (2020) 100969, currently available at https://www.entomofago.eu/wp-content/up ... hparts.pdf . My photos here can be compared with the paper's SEM images in Figures 2A and 2B, but note that their specimen shown in 2B captures the mandibles in a position that is pulled down much farther across the epipharynx than the single specimen that I'm showing here.

I was blown away by the complexity of these mouthparts. I have not spent much time looking at fly larvae, and the only kind that I've looked at in detail seemed much simpler (HERE). But that other kind was a cherry fruit fly, whose larvae live in a very simple and stable environment: the pulp of a cherry. In contrast, black soldier fly larvae are general purpose feeders that live on a wide range of decaying plant matter. Considering their diet, it makes perfect sense that the BSFL's would be equipped with a complicated mechanism that is capable of grinding and separating a wide variety of food textures. The paper by Bruno et.al. discusses the anatomy and presumed mode of operation in great detail, much more than can be seen in my photos. Quoting part of their summary:
The head walls are extremely robust and the conical shape makes it easy to penetrate the food substrate thanks to the pressure exerted by the entire larval body. The mouthparts resemble a sort of tunnel boring machine, like that used in modern times, but instead of a “whole section” disc grinder, the mouthparts move on a vertical plane, that of the mandibular-maxillary apparatus. According to the morphological evidence presented herein,we hypothesize that these two appendages rotate from a horizontal rest position onwards and downwards until the mandibular hooks touch and trespass the ventral membranous lobes, describing an angle of about 100/110°. In this way the hooks grasp more or less coarse particles of the semiliquid food and the finer rasp of the stipes grinds them into smaller parts, with the help of the lacinial teeth. The food is probably driven towards the mouth, and the hypopharynx and the chitinous septum above separate the finer particles from the coarse and inorganic particles, the last ones being expelled ventrally, probably also by contractions of the hypopharynx and the prementum. The “good” particles enter the pharynx and reach the “grinding mill”, where they undergo the last mechanical treatment. The advancement into the food substrate is likely supported by the sensorial equipment of the epipharyngeal (labral) comb of sensorial appendages, which surround the hypopharynx anteriorly.
...corroborates the hypothesis of a multifunctional apparatus that easily adapts to ingesting semiliquid food derived from any possible decaying organic matter. The exact function of the epipharynx and the hypopharynx are still somewhat unclear and in vivo video recordings could perhaps give more insights into the exact role of all the mouthparts as a whole.
Also new to me was the method that I used to prepare this specimen. Many of the structures, particularly the delicate tree-like branching of the epipharynx, do not hold up well to simple drying in alcohol. So instead, I adapted the method that the paper describes for preparing their SEM specimens: boiling in water for a few seconds, fixation of the proteins by glutaraldehyde in a neutral buffered solution, followed by dehydration in alcohol plus washing in hexamethyldisilazane (HMDS) and drying in air as a substitute for critical point drying. I'll post separately about that process.

The photographic process here was routine: specimen mounted on an insect pin with a bit of Bondic, illumination diffused through a plastic hemisphere painted white, Mitutoyo M Plan Apo 10X NA 0.28 with a Raynox DCR-150 tube lens, Canon T1i at ISO 100, second-curtain sync flash with 0.5 second shutter speed with room lights off, focus-stepped at 0.005 mm, Zerene Stacker synthetic stereo at 4 degrees off axis (8 degrees total separation).

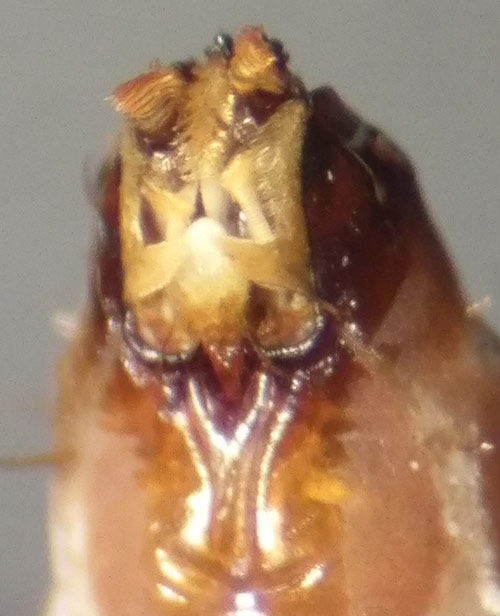
The colors shown above do not accurately reflect what I see by eye. By eye, as seen through a dissecting scope with LED illumination, the specimen appears to have much more muted colors, with none of "glowing orange" effect in the galea and other light-colored areas. The following crop from a cell phone camera, shot through a 45X dissecting scope with Jansjö LED illumination, is more realistic:
Image

For the high resolution stacked images, the camera and illumination are properly color balanced for neutral gray. So, I expect what's going on is a form of metamerism like I described at viewtopic.php?t=37664 ("interesting aspect #3"). That is, I expect that light from the chitin is enhanced in some IR or near IR component that is captured by the camera as red instead of missed by eye. But rather than adjust the colors to give a more realistic appearance, I decided to leave them as captured.

I hope you find at least some of this interesting, though I don't expect anybody else to be as fascinated as I am!

--Rik

Sumguy01
Posts: 1715
Joined: Mon Jan 28, 2013 11:05 pm
Location: Ketchikan Alaska USA

Re: BSFL mouthparts -- a miniature "tunnel boring machine"

Post by Sumguy01 »

=D> Excellent stereo photos.
Thanks for sharing.

JH
Posts: 1307
Joined: Sat Mar 09, 2013 9:46 am
Location: Vallentuna, Stockholm, Sweden
Contact:

Re: BSFL mouthparts -- a miniature "tunnel boring machine"

Post by JH »

Hi Rik
Interesting and informative. The stereos are really nice. Looking forward to the description of the preparation process.
Best
Jörgen Hellberg
Jörgen Hellberg, my webbsite www.hellberg.photo

Pau
Site Admin
Posts: 6064
Joined: Wed Jan 20, 2010 8:57 am
Location: Valencia, Spain

Re: BSFL mouthparts -- a miniature "tunnel boring machine"

Post by Pau »

awesome work =D>
Pau

Rikisub
Posts: 148
Joined: Tue Jan 29, 2013 3:21 am
Location: Spain
Contact:

Re: BSFL mouthparts -- a miniature "tunnel boring machine"

Post by Rikisub »

Absolutely amazing!

Guppy
Posts: 322
Joined: Mon Dec 20, 2010 10:36 am
Location: Switzerland
Contact:

Re: BSFL mouthparts -- a miniature "tunnel boring machine"

Post by Guppy »

Hi Rik
Absolutely interesting and very nice pictures.
Kurt

leonardturner
Posts: 713
Joined: Thu Mar 14, 2013 11:40 am
Location: Atlanta, GA, USA

Re: BSFL mouthparts -- a miniature "tunnel boring machine"

Post by leonardturner »

Rik, your stereo software and technique really shine through with this interesting and complex subject. Thanks for a great post!

Leonard

Bob-O-Rama
Posts: 200
Joined: Sat Dec 06, 2014 6:46 am
Location: Allentown, PA, USA, Earth, etc.
Contact:

Re: BSFL mouthparts -- a miniature "tunnel boring machine"

Post by Bob-O-Rama »

"Just in time for Halloween" - the stereo images are really nice as others have mentioned. It encourages me to give that a try.

Olympusman
Posts: 5090
Joined: Sun Jan 15, 2012 12:31 pm

Re: BSFL mouthparts -- a miniature "tunnel boring machine"

Post by Olympusman »

Astounding 3-D!

Mike
Michael Reese Much FRMS EMS Bethlehem, Pennsylvania, USA

rjlittlefield
Site Admin
Posts: 23605
Joined: Tue Aug 01, 2006 8:34 am
Location: Richland, Washington State, USA
Contact:

Re: BSFL mouthparts -- a miniature "tunnel boring machine"

Post by rjlittlefield »

Thanks for the many kind words!

My quest continues, for a "best possible" representation of these larvae.

Here, I have backed up all the way to no treatment at all, just photographing in cooled water immediately after kill by boiling. The trails are debris or tiny bubbles in the water, moving as the stack was shot.

Image

Image

I had to heavily sharpen this image (USM at 141%, 5.9 pixels, in the camera-sized image), because the 10X NA 0.28 objective does not like looking through a cover slip and more than 1 mm of water. So, the image is quite noisy despite being shot at ISO 100.

However, I am very happy with what I think is a total absence of shrinking and warping in the structures.

So, the above is what I'm now thinking of as "ground truth", and what I'm wondering is how close I can get to that in a dried specimen.

At this point in time, the best that I've been able to get is with a very simple and innocuous process: transfer the severed head from water into acetone, keep it there for a few days, then let it dry in air with no other chemicals. For a different specimen (and a different background), that produced this result:

Image

I have to emphasize, this is a totally dry specimen. I think it would shatter if dropped.

There is still a little shrinkage in places, notably a shallow furrow running up/down the face of each cylindrical light-colored structure. I watched the furrow form as the specimen dried in air. (I'd love to give a name for that structure, but it appears to be unlabeled in the Bruno paper.)

But other than that furrow, this seems pretty good to me.

More experiments in progress...

--Rik

rjlittlefield
Site Admin
Posts: 23605
Joined: Tue Aug 01, 2006 8:34 am
Location: Richland, Washington State, USA
Contact:

Re: BSFL mouthparts -- a miniature "tunnel boring machine"

Post by rjlittlefield »

One more for this thread...

This is the same specimen that I photographed in water, after soaking in acetone for 2 days, then in HMDS for another two days, then air dried.

Crossed-eye stereo, of course.
Image

Comparing against the earlier photo in water, it's clear that there have been some changes. There seems to have been some overall shrinkage of the softer areas, especially the feathery structures at the top of the image. The shafts of the antennae are notably narrower. (Antennae are the nipple-shaped structures sticking out sideways, just above center image on the sides of the head.)

Still, not bad for a simple process that produces a specimen that can be easily manipulated and stored.

For comparison, here again is the specimen in water, before drying.
Image


--Rik

quenoteam
Posts: 88
Joined: Fri Oct 30, 2015 1:35 pm
Location: Málaga [Spain]
Contact:

Re: BSFL mouthparts -- a miniature "tunnel boring machine"

Post by quenoteam »

Wauuu!!!!!
it's awesome, especially the first and second series as well as the last series uploaded
Incredible detail, it leaves me speechless

Troels
Posts: 600
Joined: Mon Feb 15, 2016 11:06 am
Location: Denmark, Engesvang
Contact:

Re: BSFL mouthparts -- a miniature "tunnel boring machine"

Post by Troels »

Awsome pictures and fascinating explanations.
The undistorted and symmetrical pictures from the latest series are so much nicer.
Troels Holm, biologist (retired), environmentalist, amateur photographer.
Visit my Flickr albums

rjlittlefield
Site Admin
Posts: 23605
Joined: Tue Aug 01, 2006 8:34 am
Location: Richland, Washington State, USA
Contact:

Re: BSFL mouthparts -- a miniature "tunnel boring machine"

Post by rjlittlefield »

Thanks again -- I am glad to see that this material is interesting to other people also.

A few more words about the specimen prep...

Earlier, I wrote that "I adapted the method that the paper describes for preparing their SEM specimens: boiling in water for a few seconds, fixation of the proteins by glutaraldehyde in a neutral buffered solution, followed by dehydration in alcohol plus washing in hexamethyldisilazane (HMDS) and drying in air as a substitute for critical point drying. I'll post separately about that process."

Quoting the paper, "An in-depth description of head morphology and mouthparts in larvae of the black soldier fly Hermetia illucens", Daniele Bruno et.al, Arthropod Structure & Development 58 (2020) 100969, currently available at https://www.entomofago.eu/wp-content/up ... hparts.pdf , their preparation method was as follows:
2.4. Scanning electron microscopy (SEM)
For SEM analyses, all the samples were fixed with 4% glutaraldehyde in 0.1 M Na-cacodylate buffer (pH 7.4) for 1 h at room temperature. After 5 washes in Na-cacodylate buffer, they were postfixed in a solution of 1% osmium tetroxide and 1.25% potassium ferrocyanide for 1 h in the dark. After 5 washes in Na-cacodylate buffer, samples were dehydrated in an increasing series of ethanol and washed twice (8 min each) with hexamethyldisilazane, promoting the drying of tissues. Dried specimens were mounted on stubs, gold-coated with a Sputter K250 coater, and then observed with a SEM-FEG XL-30 microscope (Philips, Amsterdam, The Netherlands).
From other readings, I eventually gathered that glutaraldehyde fixes the proteins by cross-linking and osmium tetroxide fixes the lipids, also by crosslinking. I also concluded that Na-cacodylate buffer is expensive and nasty enough that I didn't want to deal with it, and osmium tetroxide is far worse. However, the glutaraldehyde and hexamethyldisilazane seemed to be within my budget and safety envelope, so I used 4% gluteraldehyde in a pH 7.4 potassium phosphate buffer, washed in water (because potassium phosphate precipitates in alcohol), then dehydrated in ethanol, washed in HMDS, and dried in air.

All this produced the specimen shown in my first post of this thread, and I was very happy with the way it came out.

At least, I was very happy for a while. Then on further investigation I realized that while the process had yielded a very interesting specimen, that processed specimen looked very different from what I was seeing in fresh specimens under the dissecting scope. Then began the quest to produce a dry specimen that looked like what I saw with a fresh specimen in water.

That process has ended -- for now -- with the conclusion that for this critter, simple dehydration in acetone is very good, and final soaking in HMDS makes it a little better.

I am still bothered, however, by how the fresh specimen in water has obvious ribs in the cylindrical white structures, that are even more visible in the fixed specimen at start of thread, but can barely be seen after dehydration in acetone. The dry specimens are not quite right, yet. Perhaps a bit of clearing with cedarwood oil, as suggested by NikonUser HERE. But I have other things to do. Further improvements will have to wait, potentially a very long time.

--Rik

Post Reply Previous topicNext topic