Rik,
I found one on Ebay for $189. I will just purchase it and hope it is not damaged in shipment from China.
Thanks for you help.
Mike
lighting cage with CAMVATE clamps and arms
Moderators: rjlittlefield, ChrisR, Chris S., Pau
-
rjlittlefield

- Site Admin
- Posts: 23606
- Joined: Tue Aug 01, 2006 8:34 am
- Location: Richland, Washington State, USA
- Contact:
Re: lighting cage with CAMVATE clamps and arms
Very true.enricosavazzi wrote: ↑Tue Aug 23, 2022 8:32 amIf you do need an arm for precise positioning, you should not use arms that have matching rosettes to lock the arm's "elbow". These rosettes ensure that there is no slippage, but force the arm to be locked at discrete positions (usually every 2° or 4° angles, or multiples thereof). The elbow cannot lock at intermediate angles. Friction arms can be freely positioned, but must be locked tightly to prevent slippage, which makes their use impractical above 2x or so.
However, with a bit of bodging one can convert the hinge of these Camvate clamps from discrete-position rosettes to continuous friction.
The trick is simple: disassemble the hinge by unscrewing the knob, insert two properly sized washers between the rosettes, and replace the bolt with a slightly longer one that can thread fully into the knob despite the extra space taken up by the washers. On the units that I have, the knob has a lot of empty space beyond the thread, so the exact length of the longer bolt is not critical.
I did not have a replacement bolt of the proper type and length in stock, so I just used a longer 5x0.8 mm screw with two nuts positioned as required.
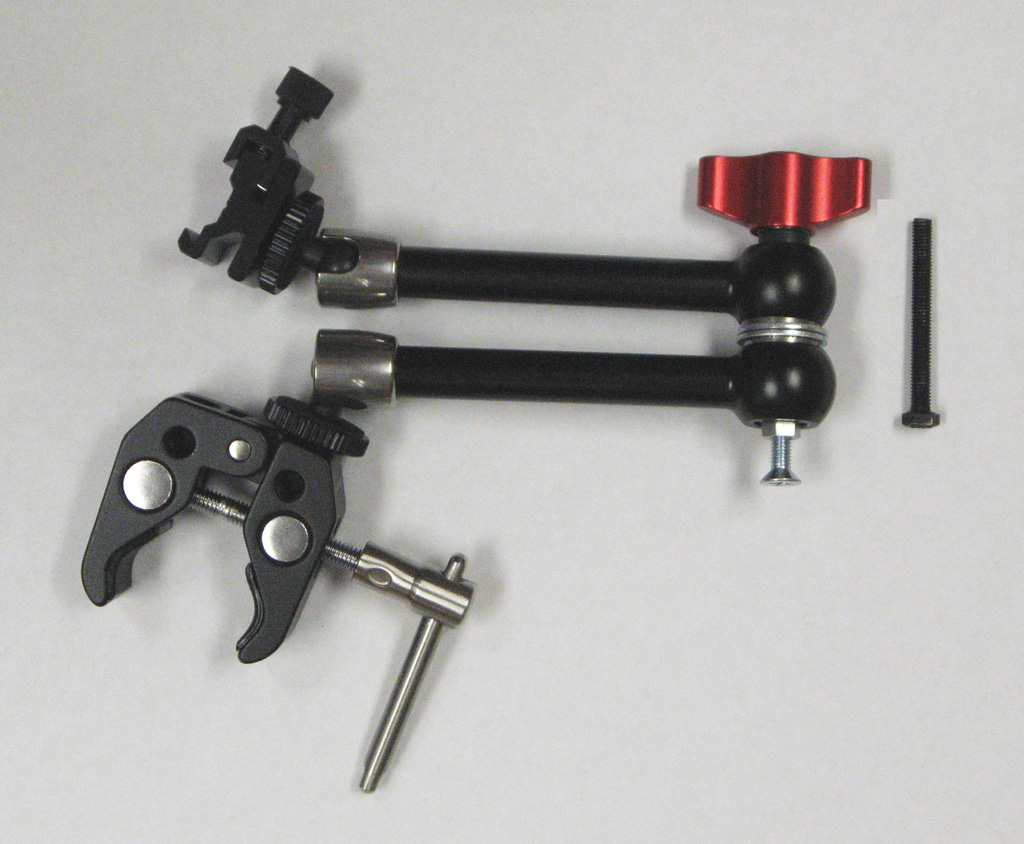
Here is the hinge disassembled, showing the old bolt and new parts.
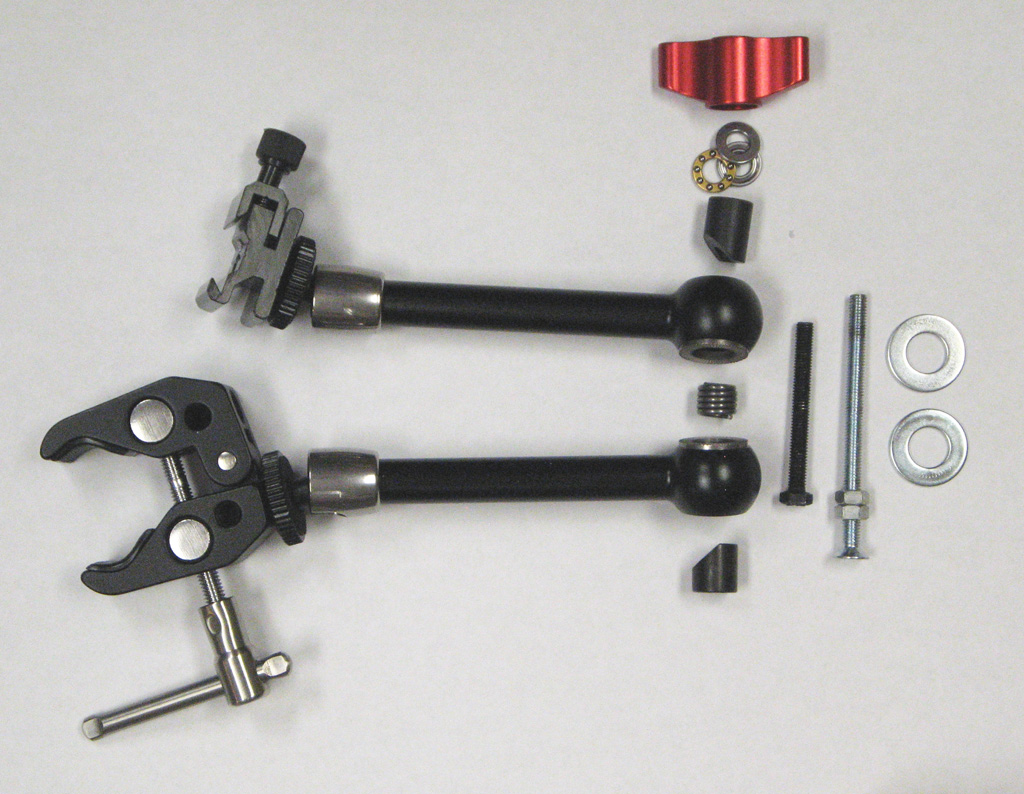
Without the added washers, the spring in the middle apparently serves to push the rosettes apart when the knob is loosened, so the arm can be repositioned more easily. With the added washers, the spring may help to maintain alignment so I left it in place.
The washers are just some things I had in stock. They are labeled 3/8" SAE zinc.
The arm is much weaker with the friction washers, but for my application the payload is much less than than the arm's own weight and that seems to work fine.
One caveat: do not attempt to use the original bolt, in some misguided hope that it will be long enough to work even with the added washers. That route may seem promising at first, but when the knob is tightened firmly, it may suddenly release when a thin-walled section of thread tears free from the rest of the knob. If that were to happen, the result might (ahem) look exactly like this:
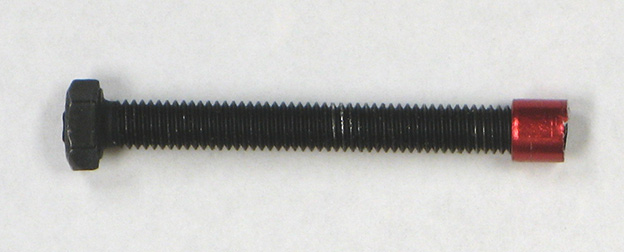
Fortunately there was plenty of competent thread left in the knob, so the modified clamp works OK despite the mishap.
--Rik

Re: lighting cage with CAMVATE clamps and arms
Rik, tips and tricks like this is one reason I enjoy photomacrography.net. And, I am expecting suitable images of the sheared threads 
It's not what you look at that matters, it's what you see - Henry David Thoreau

Re: lighting cage with CAMVATE clamps and arms
I am an even later arrival to Allan's macro YouTube party, but late has turned out to be far, far better than never. I was moving through pretty much the same videos you linked in the OP, in almost that very same order, prior to arriving here. I haven't gone and added every component he suggests to the wish list or shopping cart, both because subsequent videos will sometimes suggest replacement/improvement items, or the original ones simply disappeared from the market (such as the once-available, now-elusive "Fittest" upgrade to the Nisi NM-180 manual rail). I've likewise held off on assembling my own cage knowing full well that conversation threads like these would result in minor to moderate adjustments and improvements, not just for one particular use case or another, but as a whole. For my own use case (mobile studio photography of microfungi), the main alteration I'd be seeking to make would be added (read: any) portability. A cage that is either impractical or impossible to disassemble/collapse down to a small enough size for stowing during air travel is a cage I would likely end up using very little in my workflow, as most of what I tend to photograph is several thousands of miles away from home.rjlittlefield wrote: ↑Sun May 15, 2022 10:33 pmI have recently been watching a lot of Allan Walls Photography on YouTube (some links below).
One series that particularly interested me was about his lighting cage, which is basically a cube of rigid plastic pipe to which one can attach lots of other stuff using small clamps and articulating arms...
I haven't as much time or bandwidth as I'd like at the moment for even brainstorming what a collapsible/disassemble-able variation might entail, much less prototyping one, but I expect one or more PM/AM members will have some insights to offer, to the extent that macro cage portability appeals to more people than just myself. It would also appear that Allan has crowdsourced this effort himself on his own site (https://www.allanwallsphotography.com/the-cage-project), though how regularly this is updated, or when the last submission was added, is unclear.
2023 was already on target to be the biggest rig upgrade year on record -- from a Canon 6D to the OM-D E-M1X, and from the Canon MP-E 65mm f/2.8 1x-5x to the Olympus M.Zuiko ED 90mm f/2.8 Macro IS PRO ("Today's Best Macro Lens" to borrow a Ken Rockwell phrase) -- and that was before I stumbled upon Allan's videos. Now Godox and CAMVATE/SmallRig and the hardware store each get to take a swing at the piñata that is my bank account.
MACRO:
Olympus OM-D E-M1X, Olympus M.Zuiko 30mm f/3.5 ED, OM SYSTEM M.Zuiko Digital ED 90mm F3.5 Macro IS PRO, Gitzo GT2540EX Tripod, Acratech GV2 Ballhead, 2x Ulanzi VL49 Rechargeable Mini LED Lights, Ulanzi LED Full-Color Photography Light Wand
MICRO:
Trinocular Olympus BHS, SPlan 4x, 10x, 20x, 40x (1.25 N.A.), SPlanApo 100x Oil (1.4 N.A.), BH2-AAC Aplanatic-Achromatic 1.4 N.A Brightfield Condenser, WHK 10x 20 L Eyepieces, NFK 2.5× LD 125 Photo Eyepiece, Diagnostic Instruments PA1-10A SLR Camera Adapter, Canon 6D