My DIY automated focus stacking rig

Have questions about the equipment used for macro- or micro- photography? Post those questions in this forum.

Moderators: rjlittlefield, ChrisR, Chris S., Pau

Markus Ottosson
Posts: 24
Joined: Sat Aug 17, 2013 8:23 am

My DIY automated focus stacking rig

Post by Markus Ottosson »

I just wanted to share my DIY automated focus stacking rig based on an arduino.
Most of the plastic is printed in a 3d printer

The mechanics is all my own design and the electronics and code is based on Really Smalls (big thank you for all the help) Stackduino V2 found here:

www.flickr.com/photos/reallysmall/9177874726

There is a video on it at the bottom

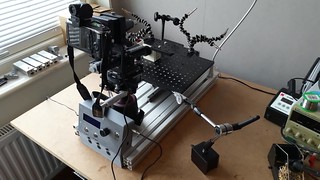
I started off with 3 pieces of extruded aluminium one 160x30mm and two 45x45mm witch I joined together to get a working area of 225mmx570mm

Image

Image

Then I made a attachment for the camera/tripod head

Image

Image

Image

I also made a t slot holder for the famous Jansjö light

Image

Image

Image

For the linear motion I used a highly overkill precision ballscrew and linear guide

Image

Image

Image

I also needed to make holders for the screw and guide

Image

Image

Image

Image

Image

To drive everything I use a Nema 17 stepper motor.

Image

Image

Image

Image

A 200mmx200mm aluminium plate with lots of hole to mount the specimen on

Image

The control panel and electronics

Image

Image

Image

Image

Image

And everything completed

Image

Image

Image

A video on how it works

ImageMy diy automatic focus stacking rig (video) by M. Ottosson, on Flickr

g4lab
Posts: 1437
Joined: Fri May 23, 2008 11:07 am

Post by g4lab »

Very nice exposition. How did you get the 3d printing to turn out so beautifully. I have made a few attempts at work and none of them turned out so nicely.

Charles Krebs
Posts: 5865
Joined: Tue Aug 01, 2006 8:02 pm
Location: Issaquah, WA USA
Contact:

Post by Charles Krebs »

Markus,

Impressive piece of work!

Thanks for posting.

RobertOToole
Posts: 2627
Joined: Thu Jan 17, 2013 9:34 pm
Location: United States
Contact:

Post by RobertOToole »

Very nice work Markus and good job on the 3D printed items.

I could use a 3D printer to finish some projects I am working on :-)

Thanks for sharing.

rjlittlefield
Site Admin
Posts: 23608
Joined: Tue Aug 01, 2006 8:34 am
Location: Richland, Washington State, USA
Contact:

Post by rjlittlefield »

It's a very impressive piece of work.

But I am a little confused by one part. Why do you mount the camera on a ballhead, when the automated rail only steps horizontally? Is this to allow off-angle stacks by using the manual slide also mounted on the ballhead?

--Rik

Lou Jost
Posts: 5990
Joined: Fri Sep 04, 2015 7:03 am
Location: Ecuador
Contact:

Post by Lou Jost »

Extremely beautiful and elegant! Congratulations!
I do have one minor suggestion, though. The light should move with the subject when stacking, so that it doesn't change angle between frames. This can be especially important with subjects with many specular reflections. Easy to fix by mounting an aluminum channel (for the light wedge-mount you made) on your subject plate. Maybe you already do something like this and I just didn't pick up on it.

Markus Ottosson
Posts: 24
Joined: Sat Aug 17, 2013 8:23 am

Post by Markus Ottosson »

rjlittlefield wrote:It's a very impressive piece of work.

But I am a little confused by one part. Why do you mount the camera on a ballhead, when the automated rail only steps horizontally? Is this to allow off-angle stacks by using the manual slide also mounted on the ballhead?

--Rik
Thank you all.
I'm planning on making a horizontal stand for the camera but until then I will have to use the ballhead.
I could use it for off-angle stacks thou as you say.

Markus Ottosson
Posts: 24
Joined: Sat Aug 17, 2013 8:23 am

Post by Markus Ottosson »

Lou Jost wrote:Extremely beautiful and elegant! Congratulations!
I do have one minor suggestion, though. The light should move with the subject when stacking, so that it doesn't change angle between frames. This can be especially important with subjects with many specular reflections. Easy to fix by mounting an aluminum channel (for the light wedge-mount you made) on your subject plate. Maybe you already do something like this and I just didn't pick up on it.
Thanks I'm aware of that so I have also designed and printed another led light that I will use.

Image

You can read about it here:
http://photomacrography.net/forum/viewtopic.php?t=28163

The Jansjö lights will be used to illuminate the background if needed.

Markus Ottosson
Posts: 24
Joined: Sat Aug 17, 2013 8:23 am

Post by Markus Ottosson »

g4lab wrote:Very nice exposition. How did you get the 3d printing to turn out so beautifully. I have made a few attempts at work and none of them turned out so nicely.
Thank you if you need any help with printer settings you can send me a PM an I will try to help out but I'm far from an expert.

Lou Jost
Posts: 5990
Joined: Fri Sep 04, 2015 7:03 am
Location: Ecuador
Contact:

Post by Lou Jost »

Wow! I figured you knew that, since you obviously have put a lot of thought into this. Amazing setup!

mjkzz
Posts: 1689
Joined: Wed Jul 01, 2015 3:38 pm
Location: California/Shenzhen
Contact:

Post by mjkzz »

I like the linear guide part, it really helps to prevent whatever mounted on it from shifting left and right.

Ball screw might not be needed if you do not want precision in micron range. I got away with that and even used a crude screw to do the job and it works even when stepping at 5um step.

https://www.flickr.com/photos/60552763@ ... ed-public/

https://www.flickr.com/photos/60552763@ ... ed-public/

Post Reply Previous topicNext topic