Another automated stacker...

Have questions about the equipment used for macro- or micro- photography? Post those questions in this forum.

Moderators: rjlittlefield, ChrisR, Chris S., Pau

delgado
Posts: 18
Joined: Mon Aug 30, 2010 8:18 am
Location: UK

Another automated stacker...

Post by delgado »

Hi everyone,

A while ago I posted some very humble beginnings of a setup: http://www.photomacrography.net/forum/v ... c&start=15

I took away the very useful comments from that thread and together with a lot of inspiration from the great set-ups on here, I've spent the last few months tinkering and putting this together:

Image

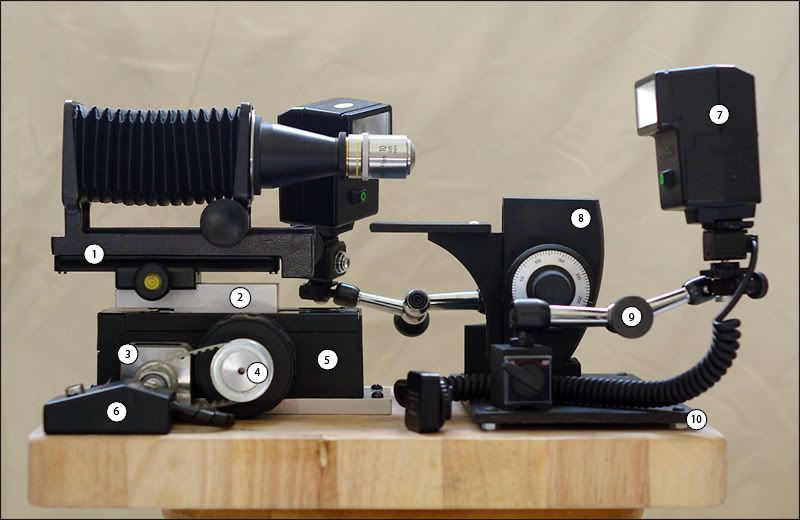
1. M42 bellows modified for arca swiss rail
2. Aluminium adaptor
3. Stepper motor, 200 steps/ revolution
4. Timing gears and belt, 1:2 - roughly 0.001mm per step
5. Nikon focus block
6. Stacking controller junction box
7. Pentax AF200T manual flash
8. Zeiss focus block subject stage, magnetic base
9. Magnetic dial test holder
10. Mild steel sheet

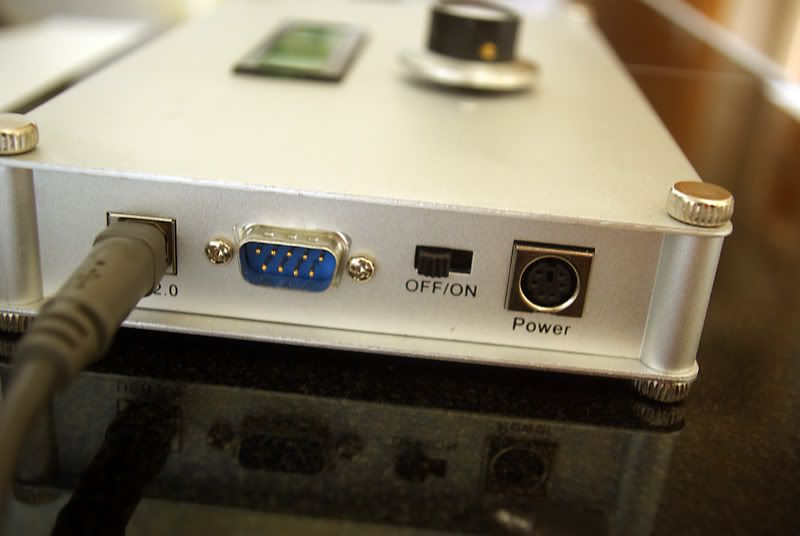
Junction box, serial for motor and camera in, jack to connect to camera:

Image

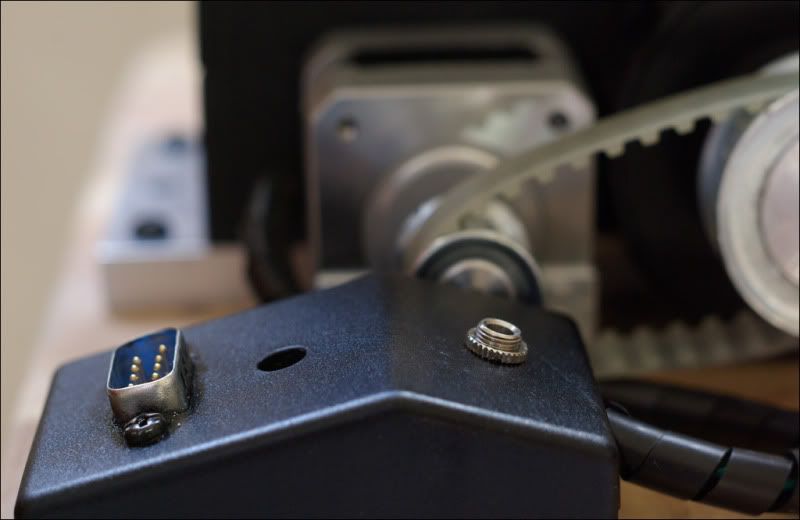
(The middle hole is for the screw that keeps the top of the box on).

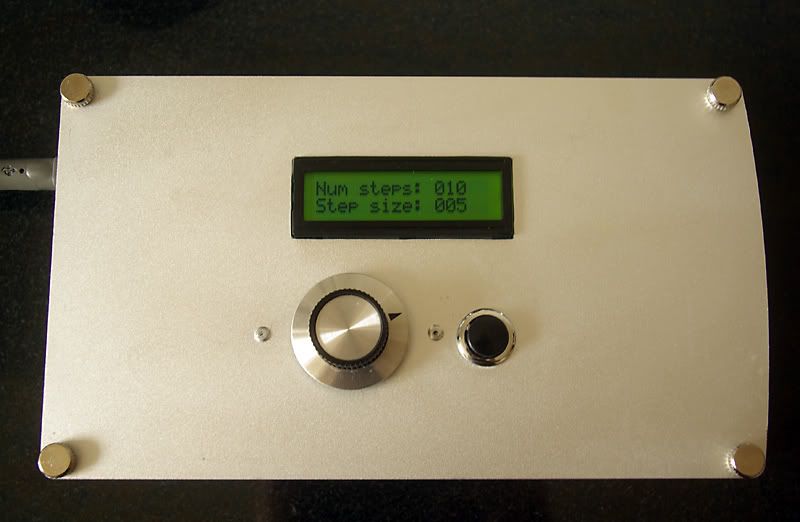
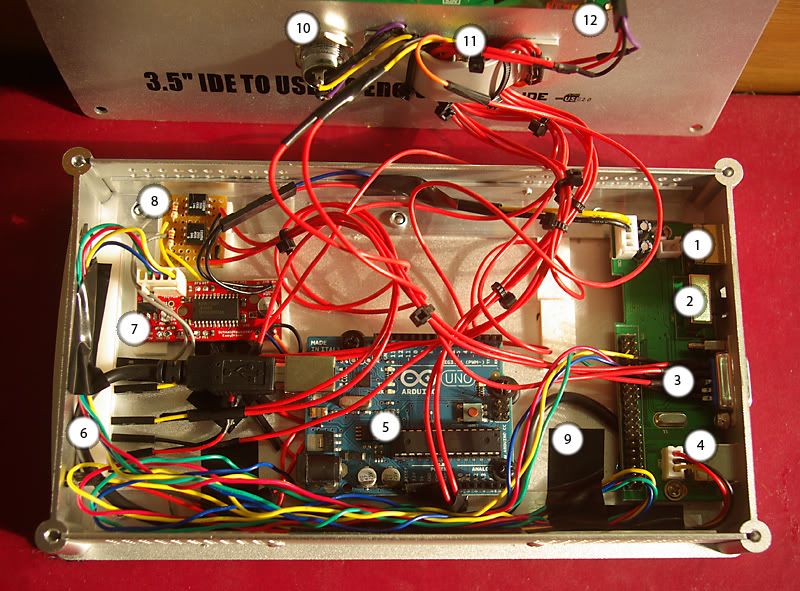
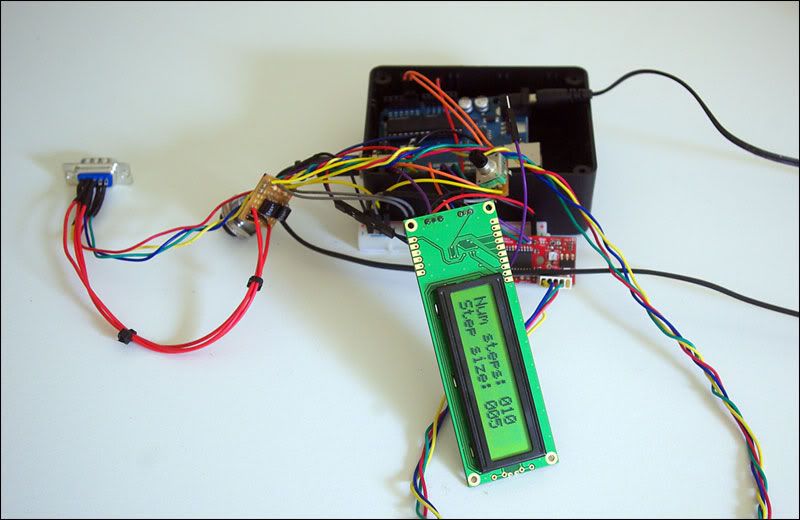
I'm using an arduino and easydriver to control the setup, together with a rotary encoder, pushbutton and lcd screen. Unfortunately I'm still mulling over what to put this in so while it's functional it isn't very pretty!

Image

I think a longer clamp would make the bellows look more secure but it does seem very solid as it is.

Looking forward to the full return of the bugs so I can finally try it out properly :D

Comments and critique welcomed!

Richard

ChrisLilley
Posts: 674
Joined: Sat May 01, 2010 6:12 am
Location: Nice, France (I'm British)

Re: Another automated stacker...

Post by ChrisLilley »

delgado wrote:I took away the very useful comments from that thread and together with a lot of inspiration from the great set-ups on here, I've spent the last few months tinkering and putting this together:
Hi Richard,

Your rig certainly seems to have come on since the last time you posted about it. I recall that you had already changed the microscope focus block to the black Nikon one here, but it was still manual-only operation. Now it is motorized - and you built and programmed it yourself. Well done, this is outside my capabilities. Some more details on what your controller can do would be welcome.

Your previous rig had the objective hanging out a fair way on a stack of extension tubes. This bellows-based rig looks better supported and less susceptible to vibration.

What sort of 'Magnetic dial test holder' are you using and did you get them in the UK or abroad? These don't look like Noga arms, what make are they?
delgado wrote:I think a longer clamp would make the bellows look more secure but it does seem very solid as it is.
Well, if it seems solid and takes good photos then its solid enough. Also, the range of coarse adjustment is the arca plate length minus the clamp length; as the clamp gets longer the range of adjustment decreases.

What sort of clamp is it? There seems to be a bubble level in the clamp knob; I don't recognise the make.

Recent experience with a 4" Kirk clamp has taught me that longer is not necessarily more solid, too.

Either I don't understand your setup, or you have no x-axis (left to right, as seen on the camera) adjustment. Is that right?

delgado
Posts: 18
Joined: Mon Aug 30, 2010 8:18 am
Location: UK

Post by delgado »

Hi Chris,

Thanks for your comments. Yes, it’s all a lot more stable now and I feel more confident in it than previously!

The controller is quite basic in terms of capability.
It uses a rotary encoder with built in push button to adjust settings – turn the dial to adjust the number of pictures to take in the stack, then click it to toggle to adjusting step size (obviously click it again and you’re back to adjustment of number of pictures). Step size is adjustable in single increments, number of pictures adjusts in multiples of 10 for simplicity. Once the settings are in, a separate push-button starts the stacking (or cancels it if pushed again during the stacking). When the stack is finished the camera is returned to the start position and the controller reverts to the setup menu again. Like most similar projects it uses opto-couplers to trigger the camera shutter. I have an expanding list of little features I want to add but now the core functionality is there they’ve been relegated to the ‘nice if I have time’ list.

Happy to share the code and parts list if of interest.

The dial test holders are described as ‘mini type’ – I got them from ebay here:http://cgi.ebay.co.uk/ws/eBayISAPI.dll? ... SA:GB:1123

What I might change on them is the tightening wheel – either for a bigger radius one or a lever, they’re a bit small to get enough torque to properly lock in the arms without putting quite a bit of effort into tightening them. Other than that niggle they work great.

The clamp is also an ebay purchase, I don’t think it’s a branded one which probably explains why it looks unfamiliar.

You’re correct, there isn’t an x axis yet, I’m currently watching some cheap linear stages which I plan to use for that. I’m thinking of using it as a ‘magnetised module’ (I think most things sound more impressive if you describe them as a module!) which I can use on the stage platform as and when needed.

Richard

Chris S.
Site Admin
Posts: 4058
Joined: Sun Apr 05, 2009 9:55 pm
Location: Ohio, USA

Post by Chris S. »

Richard, great leap forward! Glad you’re sharing it. I particularly like your Arduino-based controller—have been reading up on these, lately, looking forward to trying my own hand.
Like most similar projects it uses opto-couplers to trigger the camera shutter.
If the term "opto-couplers" is new to anyone else, here is a useful link I just read. I wondered why you didn’t use a relay, but I see optocouplers are less bulky and more reliable than relays.
The dial test holders are described as ‘mini type’ – I got them from ebay. . .What I might change on them is the tightening wheel – either for a bigger radius one or a lever, they’re a bit small to get enough torque to properly lock in the arms without putting quite a bit of effort into tightening them. Other than that niggle they work great.
I’ve wondered about eBay dial test holders like yours, which sell for a bit under half the price of the Noga version ($26 USD vs. $60 USD for Noga). I don’t have that size in Noga, but the two sizes of Noga holders that I do have tighten solidly without much torque.

Good luck on that X axis!

--Chris

delgado
Posts: 18
Joined: Mon Aug 30, 2010 8:18 am
Location: UK

Post by delgado »

Hi Chris - belated thanks for your reply, it's been a busy few weeks!

I just thought I'd add that after a lot of putting it off I finally got round to completing the controller enclosure and hence this phase of the build.

Image
Image
Image

It looks like a robot threw up inside it, but it works! I thought I'd share it not because I think it's particularly brilliant but as an illustration of what's possible. I started this with no electronics experience and was surprised how easy it seemed to get it up and running. Ideally a lot of the innards would be better put together onto one custom pcb, but I'm happy with a little mess.

I decided to use a pata hard drive enclosure because it’s about the right size, very cheap and as a bonus comes with a little control board which caters for usb in, power in for the motor driver, and even a switch to turn the motor power on and off.

It’s designed mostly for focus stacking but can equally be used as a time-lapse controller or to trigger the camera from a sensor reading - say from a beam broken by an insect approaching a flower.

I had to solder the wires to the pads underneath the arduino rather than connect through the holes in the top as there wasn’t enough vertical space for that. I might build a simple DIY arduino board for this and keep the 'proper' one for experimenting with new projects

Inside bits:

1. Easydriver 12v power in

2. 12v power in on/ off switch

3. Serial breakout port carrying through stepper motor and camera signals

4. USB in - power and reprogramming port for the arduino

5. Arduino Uno

6. 5v+ and Ground bus

7. Easydriver stepper motor controller

8. Camera interface board for triggering focus and shutter remotely

9. Space for battery - future upgrade to run the box outdoors for timelapse footage and similar.

10. Push button

11. Rotary encoder

12. LCD screen

elf
Posts: 1416
Joined: Sun Nov 18, 2007 12:10 pm

Post by elf »

I like it. Compared to mine, it's positively neat and clean :)

What batteries do you think you'll use for off the grid use?

delgado
Posts: 18
Joined: Mon Aug 30, 2010 8:18 am
Location: UK

Post by delgado »

Well originally I was going to go with 6 AAs for maximum run time but when it came to fitting it all in I realised that was never going to happen :D Looks like I'm stuck with a 9v battery for now. It may still last for long enough though if the display is put into sleep mode once the sequence is started, I need to sit down and work out how many mA the components use.

BugEZ
Posts: 850
Joined: Sat Mar 26, 2011 7:15 pm
Location: Loves Park Illinois

Opto-isolators...

Post by BugEZ »

It is a very good idea to use the opto-isolators to trigger the camera. I currently connect two of the digital IO pins on my microcontroller via 10k ohm resistors to the focus, shutter trigger and share the controller ground with the camera. I see the advantage of the optical isolation to avoid an unpleasant surprise...

You have also effectively multiplexed the functions that I get with 4 potentiometers into one rotary encoder. That makes your build very clean...

I presume that when your machine is auto stepping to create a stack the slack in the toothed belt is taken up and it holds relatively uniform tension. The only suggestion I would make would be to adjust the motor position slightly to reduce the slack. That would help reduce the hysteresis when you reverse directions. When capturing a stack, since you travel in one direction, the slack probably does not make much difference. However if you scoot back and forth when setting up to decide if your travel is deep enough the hysteresis can make the setup a bit more difficult.

Very nice indeed!

Keith

Post Reply Previous topicNext topic