3D models of bytterfly scales

Images made through a microscope. All subject types.

Moderators: rjlittlefield, ChrisR, Chris S., Pau

JH
Posts: 1307
Joined: Sat Mar 09, 2013 9:46 am
Location: Vallentuna, Stockholm, Sweden
Contact:

Post by JH »

Lou Jost wrote: Are you saying that this model is the one used to make the view at the beginning of the post?
It is.

I am not familiar enough with al 3D settings in Sketchfab – so there could be something there. But I think that it is the texture with its own shadows and lights that is the problem. My experience is that it is important to have flat shadow-less pictures for models that are intended to be lighted afterwards in a 3D scene.

Edit: I made the model downloadable, if someone wants to have a closer look.

Best regards Jörgen Hellberg
Jörgen Hellberg, my webbsite www.hellberg.photo

rjlittlefield
Site Admin
Posts: 23600
Joined: Tue Aug 01, 2006 8:34 am
Location: Richland, Washington State, USA
Contact:

Post by rjlittlefield »

JH wrote:
Lou Jost wrote: Are you saying that this model is the one used to make the view at the beginning of the post?
It is.
Here is some more background, now hidden on the previous page.
Lou Jost wrote:I'm confused. Are you saying that this model is the one used to make the view at the beginning of the post? As I said, you can see the valleys disappear as you rotate the image in your first post, so I don't see how it could be the same as this flat model you have just posted. You can see much more texture also in Rik's screenshots than in this new retouched model.
I sense surprise to go with that confusion. I'm sympathetic to both, so let me explain what I think is going on.

First, I think that mostly Lou got misled by the power of shape-from-shading. If that effect were not so powerful, then still photographers would be in a world of trouble because everything would look flat. But because it is so powerful, you really need to get rid of painted-on textures in order to get an accurate impression of shape.

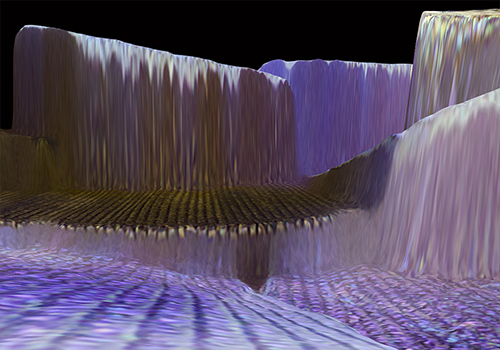
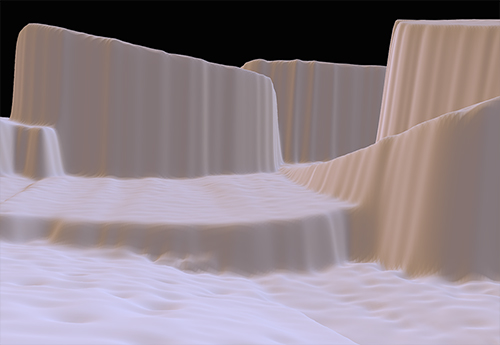
Here are corresponding views of the structure, with and without texture painted on. I think it's pretty clear that those alternating bright and dark bands pouring over the end of the dark scale provide a vivid impression of structure that simply is not present in the depth map.

Image Image

Second, as Lou mentioned earlier, taking an oblique look at a surface can be a very sensitive test of flatness. While Jörgen's use of Gaussian blur reduced the small-scale variation in depth to a level that is not visible in the un-painted depth maps, it would almost inevitably have left behind some remnant of that variation. It's conceivable -- though again I'm skeptical -- that the remnant variation would still be enough to provide the valley-hiding effect that Lou mentioned.

Finally, I strongly suspect that confirmation bias is involved somehow.

Let me explain why I think that.

Earlier, Lou wrote that
I think a sensitive test is to view the brown scales almost in profile, from the side, and look at the brightness. In this case, the brightness was the same as the brightness of the ridges, instead of the average brightness of the ridges and valleys, as it would have been if the ridge texture was absent. In fact as the scale is turned, the valleys can be seen to disappear as they are blocked by the ridges.
I thought that would make a pretty compelling case, so I went looking to see if I could find the same effect. And I did. Very interesting!

But there's a catch.

From looking at SEM pictures of wing scales like these, for example at https://www.nature.com/articles/s41598- ... /figures/6, my immediate and unthinking interpretation is that long linear shapes are raised and small rectangular shapes are depressed. Ridges and pits, if you will, rather than ridges and valleys.

In Jörgen's photo of the brown scale, the long linear structures are dark and the small rectangular shapes are lighter. Dark ridges, lighter pits (valleys). So, simple enough, I went looking for oblique viewpoints that made the scale get much darker, showing just the ridges. And I found them.

At least I thought it was simple. But then I re-read one of Lou's earlier postings about the same idea:
Lou Jost wrote:It seems to me that the lighter ridges on the brown scale which we are viewing from the tip in your upper photo are raised over the dark valleys. And when scales are viewed almost from the side, in profile, the color turns all light, indicating that the ridges are blocking the valleys.
I expect you notice the difference. Lou went looking for light ridges hiding dark valleys, I went looking for dark ridges hiding light valleys, and we both found what we were looking for.

Having now seen the depth maps with no texture painted on, I am doubtful that either one of us was actually seeing anything more than random correlations. But the discussion remains interesting in any case.

All this presumes, of course, that the words "ridges and valleys" and "brown scale" mean the same thing to Lou and myself. At least that much seems like something that we can clarify pretty quickly. Here are my ridges and valleys, about a dozen of each:

Image

--Rik

rjlittlefield
Site Admin
Posts: 23600
Joined: Tue Aug 01, 2006 8:34 am
Location: Richland, Washington State, USA
Contact:

Post by rjlittlefield »

Jörgen,

At the top of this thread, you wrote:
I used a Nikon M plan 50x NA 0.9
Is that spec of NA 0.9 correct?

Assuming it is, then the wide aperture gives this objective very shallow DOF, nominally only about 0.49 microns for green light, using the more accurate formula by Young et.al. discussed at http://www.photomacrography.net/forum/v ... 722#124722 .

--Rik

JH
Posts: 1307
Joined: Sat Mar 09, 2013 9:46 am
Location: Vallentuna, Stockholm, Sweden
Contact:

Post by JH »

rjlittlefield wrote:Jörgen,

At the top of this thread, you wrote:
I used a Nikon M plan 50x NA 0.9
Is that spec of NA 0.9 correct?

Assuming it is, then the wide aperture gives this objective very shallow DOF, nominally only about 0.49 microns for green light, using the more accurate formula by Young et.al. discussed at http://www.photomacrography.net/forum/v ... 722#124722 .

--Rik

Yes, in this case the Nikon M plan apo 50x NA 0.9 210 mm and a 2.5x projection lens. So the width of the picture is [ 36mm/ (50*2.5) =] 0.288 mm.
I used a Nikon Optiphot microscope, one turn of the fine focus is 0.1 mm. The stepping was done with a StackShot NEMA 17 motor and Zerne. I use the same formula as you do, here is a picture: http://www.photomacrography.net/forum/v ... 955#215955 and the same value for green light 0.00049 mm. Usually I go for a shorter wavelength than green to be on the safe side, in this case I used 0.0004 mm. I estimate that the depth of the stack was less than 0,1 mm. In the model, I used 0,05 which means that the model might be a little more flat than reality.
I guess that some of the noise in the depth map can be explained by random variation in step size.

Best regards
Jörgen Hellberg
Jörgen Hellberg, my webbsite www.hellberg.photo

rjlittlefield
Site Admin
Posts: 23600
Joined: Tue Aug 01, 2006 8:34 am
Location: Richland, Washington State, USA
Contact:

Post by rjlittlefield »

JH wrote:I guess that some of the noise in the depth map can be explained by random variation in step size.
Speaking as the fellow who wrote the algorithm, I'm inclined to blame the algorithm.

But in any case, shallow DOF is a very good thing in this situation because it improves the odds that you'll get good discrimination between depths that are not far apart. Your 50X NA 0.90 objective has depth resolution that's about 3.4 times better than a typical 50X NA 0.55. So indeed these depth maps are much better than what I'm used to looking at.

One more question... On the dark scales, can you check the original stack to tell whether the long dark features are ridges or valleys?

--Rik

Lou Jost
Posts: 5985
Joined: Fri Sep 04, 2015 7:03 am
Location: Ecuador
Contact:

Post by Lou Jost »

Good question!! I still see the light parts as ridges, mainly because of the observations I described above. I look forward to the answer.

carlos.uruguay
Posts: 5358
Joined: Thu Feb 23, 2012 8:05 pm
Location: Uruguay - Montevideo - America del Sur
Contact:

Post by carlos.uruguay »

Excellent

JH
Posts: 1307
Joined: Sat Mar 09, 2013 9:46 am
Location: Vallentuna, Stockholm, Sweden
Contact:

Post by JH »

rjlittlefield wrote:
One more question... On the dark scales, can you check the original stack to tell whether the long dark features are ridges or valleys?

--Rik
Lou Jost wrote:Good question!! I still see the light parts as ridges, mainly because of the observations I described above. I look forward to the answer.
I am sorry but the resolution of the depth map over the dark scales is not high enough to answer the question.

This is probably what you want to see;


Image

This is a picture where I have used a cropped part of the original photo as its own depth map. If the dark ridges or valleys are in one and the same depth and the lighter areas are in another depth the picture looks like this. The point is that this picture shows the scale of the structures we want to see.

But the actual depth map gives this result;


Image

The variation in height is on a (much) larger scale than the distances between the ridges/valleys showing that the resolution of the depth map is not high enough.

carlos.uruguay wrote:Excellent
Thanks Carlos :D


Best regards Jörgen Hellberg
Jörgen Hellberg, my webbsite www.hellberg.photo

JH
Posts: 1307
Joined: Sat Mar 09, 2013 9:46 am
Location: Vallentuna, Stockholm, Sweden
Contact:

Post by JH »

A stereo pair might be better - but I still have difficulties seeing if we talk about ridges or valleys or stripes. (hopefully I have put the pictures in the right order :D )

Image

-Jörgen
Jörgen Hellberg, my webbsite www.hellberg.photo

Post Reply Previous topicNext topic